
Maintaining your nail tools is as crucial as mastering your manicure technique. Just like a car mechanic needs well-maintained tools for optimal performance, achieving flawless and healthy nails requires keeping your nail tools in top condition. Proper care not only ensures the longevity of your tools but also safeguards your nail health by preventing infections and ensuring precise application. This guide will walk you through the essential steps to clean, sanitize, and maintain your nail tools, ensuring they remain effective and hygienic for every use.
Why Nail Tool Care Matters: Hygiene and Longevity
Think about it – your nail tools come into direct contact with your skin and nails. Using dirty or poorly maintained tools can lead to a host of problems, from minor infections to compromised manicure results. Here’s why taking care of your nail tools is non-negotiable:
- Preventing Infections: Nail tools can harbor bacteria, fungi, and viruses. Especially when dealing with cuticles and any potential micro-cuts, using unsanitized tools can introduce these harmful pathogens, leading to infections. Sterilizing your tools is a vital step in maintaining nail hygiene.
- Ensuring Tool Effectiveness: Just like any precision instrument, nail tools perform best when they are clean and sharp. Residue buildup on nippers or files can make them less effective, requiring more force and potentially damaging your nails or cuticles. Regular cleaning ensures your tools function optimally.
- Extending Tool Lifespan: Investing in quality nail tools is worthwhile, and proper maintenance protects that investment. Cleaning and storing your tools correctly prevents rust, corrosion, and damage, significantly extending their lifespan and saving you money in the long run.
- Professional Manicure Results: Clean tools contribute to a clean and professional manicure. Imagine trying to sculpt with a dirty brush or cut with dull scissors – the result won’t be as refined. Sharp, clean nail tools allow for precise work, leading to a more polished and professional finish, whether you’re aiming for a natural look or applying gel polish.
Essential Nail Tools and Basic Understanding
Before diving into care, let’s briefly touch upon the common nail tools you likely use and their primary functions. Understanding their purpose helps in appreciating the importance of their upkeep.
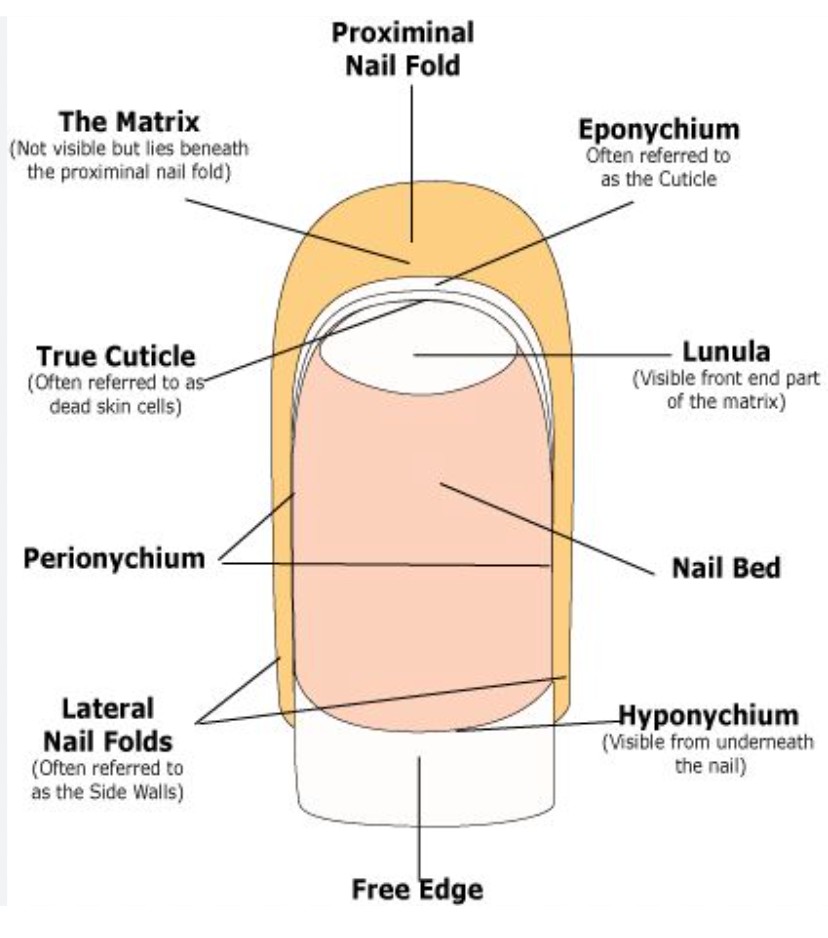
- Cuticle Pusher: Used to gently push back the eponychium (the fold of skin at the base of the nail) and to scrape away dead cuticle tissue from the nail plate. Gentle manipulation is key to avoid damaging the living tissue.
Alt text: Detailed view of nail anatomy diagram highlighting eponychium and cuticle areas, emphasizing the importance of gentle cuticle care.
- Cuticle Nippers: Designed to trim excess cuticle (dead skin) that has grown onto the nail plate. Sharp, precise nippers are essential for clean cuts and preventing tearing of live skin. As mentioned earlier, avoid cutting living skin (eponychium).
Alt text: Illustration contrasting the eponychium (live skin) and cuticle (dead skin), underscoring the need to only remove the dead cuticle tissue during manicure.
- Nail Files: Used to shape and refine the edges of your nails. Different grits are available for various purposes, from shaping to smoothing. Regular filing helps maintain nail shape and prevent snags.
- Buffers: Used to smooth the surface of the nail, remove ridges, and add shine. Buffing should be done gently to avoid thinning the nail plate.
- E-file (Electric File): A more advanced tool, often used for gel removal and cuticle work. Requires training and caution to use safely and effectively, especially for cuticle care. For home users, manual tools are often safer and easier to control for cuticle maintenance.
- Nail Brush: Used to clean dust and debris from nails and tools. Essential for removing filing dust and ensuring a clean surface for polish application.
Step-by-Step Guide to Cleaning and Sanitizing Nail Tools
Maintaining clean nail tools involves a multi-step process: cleaning, sanitizing (or disinfecting), drying, and proper storage. Here’s a detailed guide:
1. Cleaning After Each Use: Immediate Debris Removal
- Wipe off residue: Immediately after each use, wipe off any visible nail dust, skin particles, or product residue from your tools. A clean paper towel or a dry brush can be used for this step. This prevents buildup and makes thorough cleaning easier later.
2. Washing with Soap and Water: Deep Cleaning
- Gather supplies: You’ll need warm water, liquid soap (antibacterial is preferable), a soft brush (like an old toothbrush or a dedicated tool cleaning brush), and a clean towel.
- Wash tools: Fill a sink or basin with warm soapy water. Submerge your tools and gently scrub them with the brush to remove any remaining debris. Pay attention to crevices and joints where residue can accumulate, particularly on cuticle nippers and pushers.
- Rinse thoroughly: Rinse each tool thoroughly under running warm water to remove all soap residue. Soap left on tools can cause irritation or interfere with sanitizing solutions.
3. Sanitizing/Disinfecting Nail Tools: Eliminating Pathogens
This step is crucial for killing bacteria, fungi, and viruses. There are several effective methods:
-
Isopropyl Alcohol (70-90%):
- Submerge or wipe: For metal tools (nippers, pushers, files), you can submerge them in 70-90% isopropyl alcohol for at least 30 minutes. Alternatively, thoroughly wipe down all surfaces of the tools with alcohol using a saturated cotton pad or cloth.
- For buffers and brushes: Spritz buffers and nail brushes generously with isopropyl alcohol, ensuring they are saturated. Allow to air dry completely. Note that excessive soaking might degrade some buffers.
- Air dry: Allow tools to air dry completely on a clean towel. Do not towel dry, as this can re-introduce contaminants.
-
Commercial Tool Disinfectants (e.g., Barbicide): These are professional-grade disinfectants designed for salon use and are highly effective.
- Follow instructions: Always follow the manufacturer’s instructions for dilution and contact time. Barbicide typically requires a 10-minute soak for disinfection.
- Use appropriately: These solutions are potent and should be handled with care, following safety guidelines.
-
Autoclave (Professional Use): Autoclaving is the most effective sterilization method, using high-pressure steam to kill all microorganisms. This is typically used in professional salon settings and medical environments, not for home use due to the equipment and training required.
4. Drying and Storage: Preventing Rust and Damage
- Air dry completely: Allow all tools to air dry fully before storing. This prevents moisture buildup, which can lead to rust, especially on metal tools like nippers and cuticle pushers. Lay them out on a clean, dry towel to air dry.
- Proper storage: Store your tools in a clean, dry place. Tool cases, pouches, or containers are ideal for protecting them from dust and damage. For nippers and cuticle pushers, consider storing them with the blades or tips protected to prevent dulling or damage. Individual slots or compartments within a storage case are best to prevent tools from scratching each other.
Maintaining Nail Tool Sharpness and Condition
Beyond cleaning and sanitizing, maintaining the physical condition of your tools is essential for their performance and longevity.
- Replacing Files and Buffers: Nail files and buffers wear down with use. Replace them regularly, especially when you notice they are becoming less effective or are visibly worn. For frequent users, replacing files every few manicures and buffers every month or two is recommended.
- Sharpening Nippers (Professional Service): Cuticle nippers can become dull over time, especially with frequent use. While home sharpening is possible with specialized tools and skills, it’s often best to have nippers professionally sharpened. Many beauty supply stores or tool sharpening services offer this. Attempting to sharpen them yourself without proper technique can damage the blades.
- Oiling Joints of Nippers: A tiny drop of sewing machine oil or specialized tool oil on the joint of cuticle nippers can keep them moving smoothly and prevent stiffness or rust. Apply sparingly and wipe off any excess.
- Regular Inspection: Periodically inspect your tools for signs of damage, rust, or wear. Replace any tools that are damaged or no longer functioning effectively. Rust can be difficult to remove completely and can compromise the tool’s hygiene and performance.
Best Practices for Nail Tool Hygiene
- Personal Use Tools: Ideally, have a set of nail tools dedicated for your personal use only. This significantly reduces the risk of cross-contamination.
- Avoid Sharing Tools: Never share your nail tools with others, as this is a primary way infections can spread. Even among family members, it’s best to maintain individual sets of tools.
- Regular Deep Cleaning Schedule: Establish a routine for deep cleaning and sanitizing your tools. For personal use, a thorough cleaning and sanitizing session once a week or after every use is ideal. For professional use, tools must be cleaned and sanitized after every single client.
- Gentle Handling: Handle your nail tools with care to prevent accidental damage. Avoid dropping them or storing them haphazardly, which can bend tips, dull blades, or cause other damage.
Conclusion: Invest in Tool Care for Healthy, Beautiful Nails
Just as proper car maintenance ensures a smooth ride, consistent nail tool care guarantees healthy, beautiful nails and flawless manicures. By following these guidelines for cleaning, sanitizing, and maintaining your nail tools, you’re not only extending the life of your instruments but also prioritizing hygiene and achieving professional-quality results every time you care for your nails. Make nail tool care a non-negotiable part of your beauty routine, and you’ll reap the rewards of healthy, well-manicured nails for years to come.