Have you ever faced frustrating electrical issues in your car, like flickering lights, malfunctioning sensors, or perplexing electrical gremlins? Pinpointing and resolving these problems used to be a daunting task. Fortunately, with the advent of digital Car Circuit Scanner Diagnostic Tools, identifying the root cause of automotive electrical issues has become more accessible than ever, even for those with limited experience. This guide will equip you with the knowledge to effectively utilize a circuit scanner and troubleshoot like a seasoned expert, regardless of your starting point.
Understanding the Digital Car Circuit Scanner Diagnostic Tool
A digital car circuit scanner diagnostic tool is specifically engineered to facilitate the swift and accurate diagnosis of electrical faults within your vehicle’s intricate wiring system.
Imagine it as a specialized flashlight for your car’s electrical system. Just as a flashlight illuminates dark corners, a circuit scanner illuminates problem areas within the complex network of wires, making fault detection significantly faster and more precise compared to manual wire tracing or guesswork.
Modern vehicles are increasingly reliant on electrical components, ranging from critical engine sensors to sophisticated infotainment systems. These components are interconnected through complex circuit networks, making the diagnosis of electrical problems a notoriously challenging undertaking.
A digital car circuit scanner simplifies this complexity by performing tests for voltage, continuity, and signal flow. This provides a clear picture of where electrical issues may be lurking, enabling you to target your troubleshooting efforts effectively.
Essential Features and Functions of a Car Circuit Scanner
To maximize the potential of a car circuit scanner, it’s crucial to grasp its core functionalities. While specific capabilities may vary across different models, most scanners offer these fundamental features:
- Voltage Testing: This function measures whether a circuit is receiving the correct electrical pressure, or voltage. Think of it as checking the water pressure in your home’s plumbing. Too high or too low voltage can indicate underlying problems within the electrical system.
- Continuity Testing: Continuity testing verifies if an electrical circuit is complete and unbroken. Consider a string of Christmas lights; if one bulb is faulty, the entire string might fail. Continuity testing helps you identify the “broken bulb” in your car’s circuits, pinpointing breaks or interruptions in the wiring.
- Short Circuit Detection: Short circuits occur when electricity deviates from its intended path, often due to damaged wiring, finding a quicker route to ground. Short circuit detection helps locate these unintended pathways, allowing you to quickly identify and address the source of the short without laboriously inspecting every wire.
- Signal Tracing: This valuable feature enables you to follow an electrical signal from its origin to its destination, much like following a trail of breadcrumbs. Signal tracing ensures that signals are reaching their intended components without disruption, helping diagnose communication issues within the electrical system.
Each of these features plays a distinct role in diagnosing various electrical problems. Understanding their functions is the foundational step towards becoming a proficient and self-reliant car electrical troubleshooter.
Step-by-Step Guide: Diagnosing with a Digital Circuit Scanner
The Foxwell GT60 is an excellent example of a user-friendly diagnostic tool that incorporates all the essential functions mentioned above. Designed with both beginners and professionals in mind, the GT60 makes automotive diagnostics approachable and efficient. Here’s a step-by-step guide on using such a scanner to identify and resolve electrical issues in your vehicle.
Step 1: Powering Up and Connecting Your Scanner
Before commencing any diagnostic procedures, ensure your GT60 or chosen scanner is adequately charged or connected to an external power source. Scanners with large touchscreens, like the GT60, can consume battery power quickly. For extended diagnostic sessions, it’s advisable to keep it plugged in for uninterrupted operation.
Locate your vehicle’s OBD2 port. This port is typically situated under the dashboard on the driver’s side. Connect the GT60’s OBD2 cable to this port. Upon powering on, the GT60 will automatically identify your car’s make, model, and year, eliminating manual setup and ensuring accurate and rapid diagnostics.
Step 2: Selecting the Appropriate Diagnostic Mode
The GT60 and similar scanners offer a range of diagnostic modes tailored for specific tests. Choosing the correct mode is crucial for effective issue resolution:
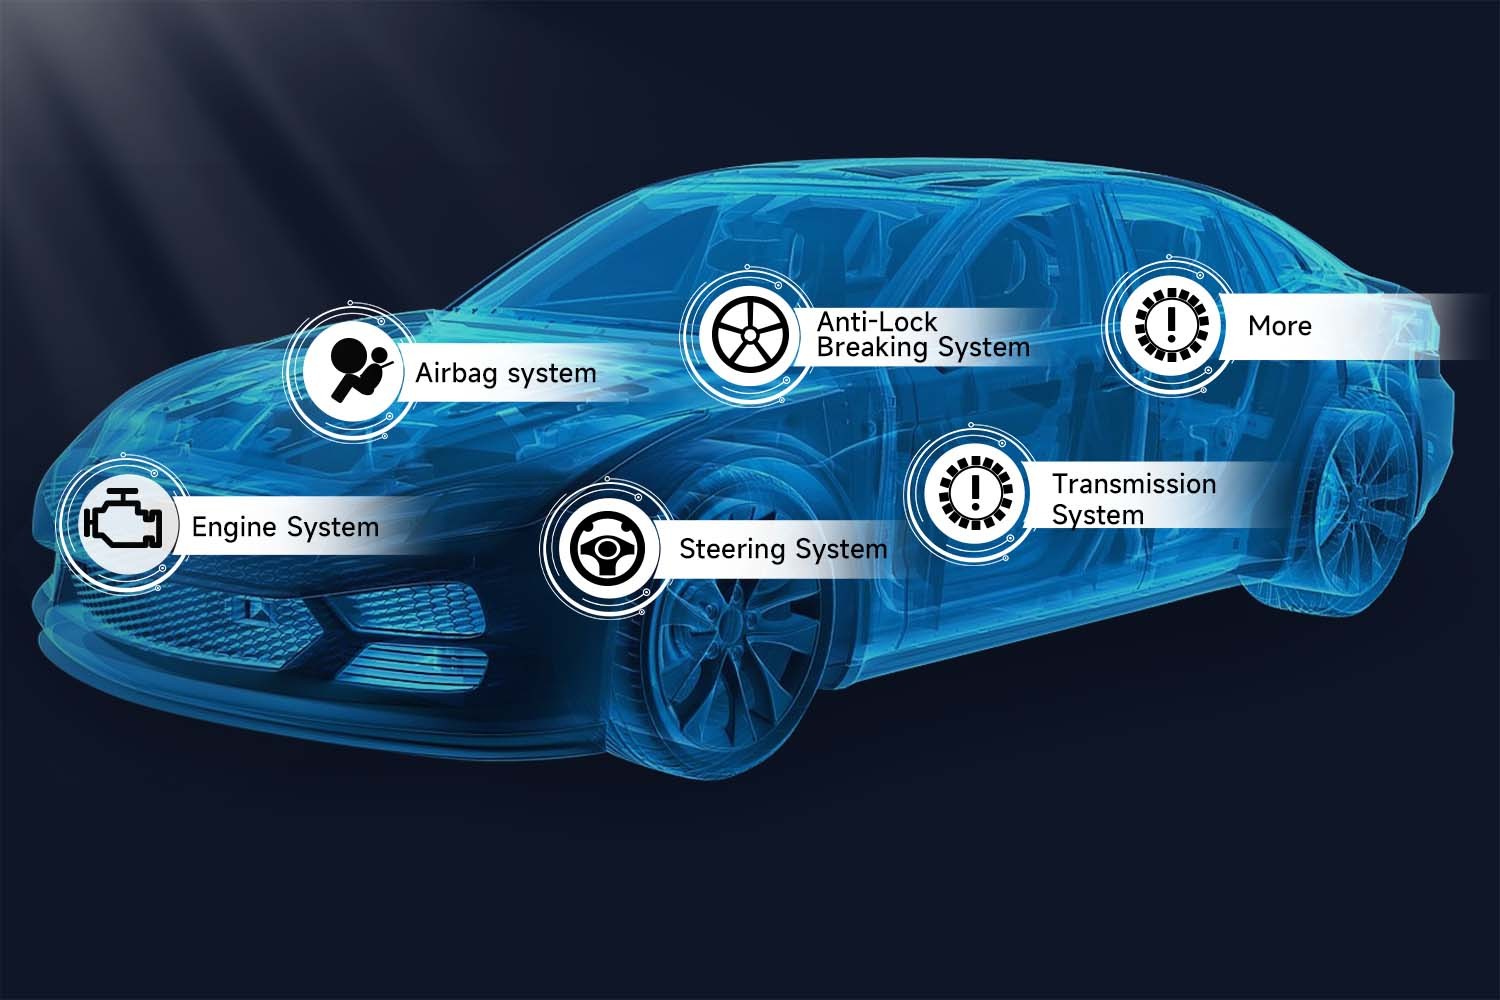
- Full System Scan: When the nature of the electrical issue is unclear, initiating a full system scan provides a comprehensive overview of your vehicle’s electrical health. This mode examines all major systems, including the engine, transmission, ABS, and more, for irregularities and provides a holistic assessment of your car’s electrical state.
- Voltage Testing: When you suspect issues related to power delivery, voltage testing is the go-to mode. The GT60 will display real-time voltage readings, typically ranging between 12 and 14 volts when the engine is running. Significant drops or fluctuations in voltage can point to weak connections, battery problems, or circuit overloads, warranting further investigation.
- Specialized Module Testing: If your problem seems confined to a specific system, such as the BCM (Body Control Module) or ECM (Engine Control Module), the GT60 allows for targeted testing of these individual modules. This focused approach is invaluable for pinpointing faults within complex systems, saving time and effort compared to a broad system scan.
Step 3: Interpreting Diagnostic Data
Once you’ve selected and completed a test, the GT60 will present diagnostic information. While initially this data might seem complex, the scanner’s user-friendly interface is designed to clarify the meaning of each piece of information. Here’s what to focus on when reviewing your GT60 data report:
- Voltage Data: The scanner displays voltage levels for the circuit being tested. Healthy circuits typically show readings within the 12-14 volt range (when the engine is running). Readings outside this range are indicators of potential power supply issues within the circuit.
- Diagnostic Trouble Codes (DTCs): The GT60 will present any Diagnostic Trouble Codes (DTCs) along with descriptive explanations to simplify interpretation. For example, a “P0420” code commonly indicates catalytic converter inefficiency, while a “P0300” code signals engine misfires. Understanding these codes is key to diagnosing the problem area.
- Freeze Frame Data: When an issue is detected, the GT60 automatically captures freeze frame data, which includes parameters like engine temperature and load conditions at the moment the fault occurred. This contextual information provides invaluable insights to aid in diagnosis, giving a snapshot of the conditions under which the problem arose.
Step 4: Saving and Reviewing Diagnostic Reports
A particularly useful feature of the GT60 is its ability to save diagnostic reports. This functionality is incredibly beneficial for tracking intermittent issues over time or for maintaining a record of your vehicle’s electrical health. Saved reports can be reviewed later or easily shared with a professional mechanic for consultation, streamlining communication and facilitating efficient repairs.
By diligently following these steps, you can fully leverage the diagnostic power of your Foxwell GT60 or similar car circuit scanner. Proper setup and mode selection transform complex diagnostics into a manageable process, empowering you to efficiently identify and resolve electrical problems.
Common Circuit Issues and Scanner Detection
A circuit scanner like the GT60 is instrumental in identifying a wide array of electrical system problems in your car:
- Blown Fuses: Overcurrent in a circuit can lead to blown fuses. The GT60’s short circuit detection mode and overload indicator can quickly pinpoint the location of a blown fuse, enabling direct replacement without unnecessary trial and error.
- Loose Connections: Corroded or loose connections often manifest as erratic voltage readings. Utilizing the voltage testing mode, the GT60 can detect these voltage irregularities, guiding you to identify and rectify loose or corroded connections.
- Short Circuits: Manually tracing short circuits can be a time-consuming and frustrating task. The GT60 simplifies this significantly. By performing a full system scan and observing abnormal data patterns, you can rapidly identify areas where current is taking unintended “shortcuts” through the wiring.
- Damaged Wires: Frayed or damaged wires impede the proper flow of electricity. The continuity test function allows you to verify the integrity of a wire, confirming whether it’s intact or has a break somewhere along its length.
Familiarity with these common scenarios and how a circuit scanner aids in their detection makes handling car electrical problems significantly less daunting.
Safety Guidelines When Using a Diagnostic Tool
Working with car electrical circuits demands adherence to safety precautions:
- Power Down When Possible: Unless the diagnostic test specifically requires power, always turn off the car’s ignition to minimize the risk of electrical shocks or accidental short circuits.
- Wear Protective Gear: Always wear safety gloves and eye protection, particularly when working near the car battery or any exposed wiring.
- Maintain a Dry Workspace: Water and electricity are a dangerous combination. Ensure you are working in a dry environment to avoid electrical hazards.
- Double-Check Probe Connections: Carefully verify that you are connecting the scanner probes to the correct points in the circuit. Incorrect connections can potentially damage both the scanner and your vehicle’s electrical system.
Practicing caution significantly reduces the risk of accidents and equipment damage.
Troubleshooting Common Scanner Issues
Encountering problems with your GT60 or another circuit scanner? Here are some quick troubleshooting steps:
- Scanner Won’t Power On: First, confirm that the scanner is fully charged or properly connected to a reliable power source. If connected to the car’s battery, ensure the battery itself is not depleted.
- No Readings Displayed: Ensure that the scanner probes are securely connected to the test points and that you have selected the correct diagnostic mode for the test you are performing.
- Inconsistent Readings: Erratic or fluctuating readings often result from loose probe connections. Tighten the connections and re-verify probe contact to resolve this issue.
These simple fixes often resolve common scanner operational issues and get you back to diagnosing efficiently.
Glossary of Essential Terms in Car Circuit Diagnostics
- Voltage: The measure of electrical potential difference or pressure in a circuit.
- Current: The rate of flow of electric charge in a circuit, measured in amperes (amps).
- Resistance: The opposition to the flow of electric current in a circuit, measured in ohms.
- Continuity: The state of an electrical circuit being complete and unbroken, allowing current to flow.
- Short Circuit: An abnormal electrical connection of low resistance between two points in a circuit, resulting in excess current flow bypassing the intended path.
Understanding these fundamental terms will enhance your comprehension of scanner outputs and diagnostic results.
Further Resources for Automotive Circuit Diagnostics
For those seeking to deepen their knowledge of car circuit diagnostics, numerous resources are available. Online courses, specialized automotive forums, and instructional YouTube channels offer a wealth of information to expand your understanding and refine your diagnostic skills.
Conclusion: Empowering Your Car Electrical Diagnostics
Utilizing a digital car circuit scanner, such as the Foxwell GT60, fundamentally simplifies the process of automotive electrical diagnostics.
By familiarizing yourself with its functions, adhering to a systematic diagnostic procedure, and selecting the appropriate test modes, you can effectively troubleshoot electrical issues, saving both time and money. More importantly, you’ll gain the confidence to tackle future electrical challenges that may arise in your vehicle, ensuring your car’s electrical system operates smoothly and reliably for years to come.
FAQs
Can I keep an OBD2 scanner plugged in while driving?
Yes, it is generally safe to leave an OBD2 scanner connected while driving. Many drivers do this to monitor real-time vehicle data. However, ensure the device is securely positioned to prevent distractions or accidental disconnection, which could be unsafe while driving.
Does OBD2 function when the car is turned off?
Generally, no. Most OBD2 scanners require the vehicle to be in the “on” or “accessory” mode to access and read data. While some scanners might offer limited functionality when the car is off, accessing live data streams typically necessitates the engine running or the ignition at least in the accessory position.
What types of problems can OBD2 scanners detect?
An OBD2 scanner is capable of detecting a wide range of issues pertaining to engine performance, emissions control systems, transmission function, ABS (Anti-lock Braking System), fuel delivery systems, and more. It can identify diagnostic trouble codes related to malfunctioning sensors, engine misfires, oxygen sensor faults, and various other malfunctions that can negatively impact vehicle health and performance.