For any car owner experiencing the dreaded check engine light or noticing performance issues, a car diagnostic scanner, also known as an OBD2 scanner, is an invaluable tool. But before you can decipher those cryptic error codes and start troubleshooting, you need to know the fundamental first step: where to plug in your car diagnostic scanner. This guide will walk you through everything you need to know about locating and connecting your OBD2 scanner, ensuring you can quickly and effectively access your vehicle’s diagnostic information.
Locating Your OBD2 Port
The good news is that finding your OBD2 port is usually a straightforward process, as it’s standardized across nearly all passenger vehicles manufactured since 1996. The standard location is designed for easy access, typically without needing any tools or contortions.
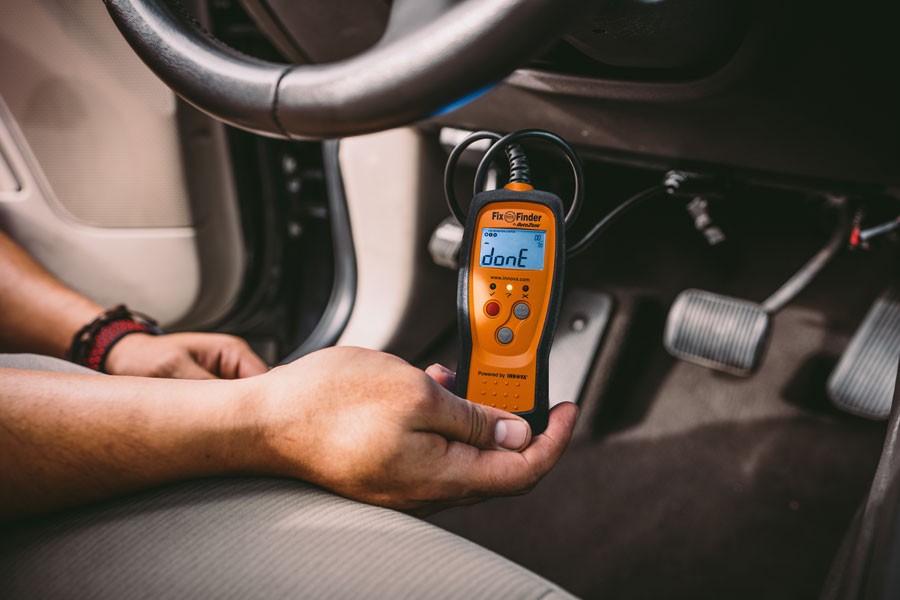
In the vast majority of cars and trucks, you’ll find the OBD2 port located under the driver’s side dashboard. Specifically, it’s commonly positioned within a foot or two of the steering column. You’ll be looking for a 16-pin, female connector that is trapezoidal in shape. It might be immediately visible, or it could be tucked slightly under the dash panel, but it should be in plain sight once you look underneath.
While the driver’s side under-dash location is the most common, there are a few instances where manufacturers might place the OBD2 port in alternative locations. These less common spots include:
- Center Console: In some vehicles, particularly larger SUVs or trucks, the OBD2 port might be found inside the center console. Check within the storage compartment or on the sides of the console.
- Under the Passenger Side Dashboard: Less frequently, the port could be located on the passenger side, in a similar position to the standard driver’s side location.
If you’re having trouble locating the port, consulting your vehicle’s owner’s manual is always a good idea. The manual will usually have a diagram indicating the precise location of the OBD2 diagnostic port.
Step-by-Step Guide to Plugging in Your OBD2 Scanner
Once you’ve located the OBD2 port, connecting your scanner is a simple plug-and-play process. The connector is designed to fit only one way, so you don’t need to worry about inserting it incorrectly. Here’s a step-by-step guide:
- Turn Off the Ignition: Ensure your vehicle’s ignition is completely turned off before you begin. This is a safety precaution and helps ensure a stable connection.
- Connect the OBD2 Scanner: Take the male connector of your OBD2 scanner and carefully align it with the trapezoidal shape of the OBD2 port in your vehicle. Gently but firmly push the scanner connector into the port. You might feel a slight resistance, and a little wiggle can help ensure a secure connection.
- Turn the Ignition to the “ON” Position (Engine Off): Turn your ignition key to the “ON” position. This means the dashboard lights and electrical systems are active, but the engine is not started. This step provides power to the OBD2 port and your scanner.
- Wait for the Scanner to Power Up: In most cases, the OBD2 port will provide power to your scan tool as soon as it’s connected and the ignition is in the “ON” position. Wait for your scanner to complete its boot sequence. This might take a few moments, and the scanner screen will typically indicate when it’s ready to use.
After these steps, your OBD2 scanner should be powered up and ready to communicate with your vehicle’s computer system. The scanner’s display will guide you through any further steps, such as selecting your vehicle’s make and model or initiating a diagnostic scan.
Navigating the OBD2 Scanner Menu
Once your scanner is connected and powered on, you’ll be presented with a menu offering various diagnostic options. The exact menu options will depend on the type of scanner you are using, from basic code readers to more advanced professional-grade tools. Commonly, you will find options such as:
- Read Codes: This is the primary function for most users. Selecting “Read Codes” will instruct the scanner to retrieve any stored or pending Diagnostic Trouble Codes (DTCs) from your vehicle’s computer. These codes are numerical and alphabetical combinations that pinpoint potential issues within different vehicle systems.
- Erase Codes: After diagnosing and resolving a problem, you can use the “Erase Codes” function to clear the DTCs and turn off the check engine light. Be cautious when using this function, and only erase codes after you’ve addressed the underlying issue.
- Live Data: More advanced scanners offer a “Live Data” or “Data Stream” option. This allows you to view real-time sensor readings from various engine and vehicle systems. Live data can be incredibly helpful in diagnosing intermittent problems or monitoring sensor performance.
- Freeze Frame: “Freeze Frame” data captures a snapshot of sensor readings and vehicle conditions at the precise moment a DTC was triggered. This information provides valuable context for understanding the conditions under which a fault occurred.
- Vehicle Info: This option typically displays basic information about your vehicle, such as the Vehicle Identification Number (VIN) and other build details.
- I/M Readiness: “I/M Readiness” (Inspection and Maintenance Readiness) checks the status of your vehicle’s emission control systems. This is particularly useful before smog checks or emissions tests, as it can indicate if your vehicle is likely to pass.
Most OBD2 scanners are equipped with buttons for navigation. Arrow keys allow you to scroll through menu options, a select or “OK” button confirms your choices, and a “back” or “escape” button lets you return to the previous menu.
Decoding Car Diagnostic Codes: Understanding DTCs
When you use the “Read Codes” function, your scanner will display a series of DTCs. These codes might seem like gibberish at first, but they follow a standardized format that makes them decipherable. A DTC is always structured as one letter followed by four numbers, for example, P0301.
The first letter indicates the vehicle system where the fault is located:
- P (Powertrain): Relates to the engine, transmission, fuel system, and emissions.
- B (Body): Concerns body control systems, including airbags, power windows, and interior electronics.
- C (Chassis): Indicates issues with chassis systems like brakes, suspension, and steering.
- U (Network or Communication): Points to network communication problems within the vehicle’s electronic systems.
The first number after the letter is either a 0 or a 1:
- 0: Indicates a generic OBD2 code, standardized across all manufacturers.
- 1: Signifies a manufacturer-specific code, meaning it’s defined by a particular car manufacturer.
The subsequent numbers provide further detail about the specific system and fault. For instance, the third digit categorizes the subsystem within the broader system indicated by the letter:
- 1: Fuel and Air Metering
- 2: Fuel and Air Metering (Injector Circuit)
- 3: Ignition System or Misfire
- 4: Auxiliary Emission Controls
- 5: Vehicle Speed Control and Idle Control System
The final two digits pinpoint the specific component or circuit that is experiencing the problem. With hundreds of possible combinations, online resources and dedicated code readers with built-in databases are invaluable for looking up the precise meaning of each DTC.
In our example code, P0301, we can break it down: “P” tells us it’s a powertrain code, “0” indicates it’s a generic code, and “3” points to the ignition system or misfire. Specifically, P0301 is a common code indicating a cylinder #1 misfire.
The Benefits of Using a Car Diagnostic Scanner
Investing in an OBD2 scanner and knowing Where To Plug In Car Diagnostic tools offers numerous benefits for car owners:
- Save on Diagnostic Costs: Instead of immediately taking your car to a mechanic for a diagnostic check, you can use your own scanner to get an initial understanding of the problem. This can save you money on diagnostic fees.
- Early Problem Detection: An OBD2 scanner allows you to identify potential issues early on, often before they escalate into more serious and expensive repairs.
- Check Engine Light Insights: The check engine light can be triggered by various issues, from minor to severe. A scanner helps you understand the reason behind the light, rather than driving with uncertainty.
- Smog Check Preparation: The I/M Readiness function can help you determine if your vehicle is prepared to pass an emissions test, preventing potential failures and re-test fees.
- DIY Repair Guidance: For those comfortable with DIY car maintenance, a scanner can provide valuable information to guide your repairs. For example, a code indicating an oxygen sensor fault (like P0138, mentioned in the original article) can point you directly to a faulty sensor that you can replace yourself.
By understanding where to plug in your car diagnostic scanner and how to interpret the results, you empower yourself to be a more informed car owner, capable of proactive maintenance and cost-effective repairs. Explore the range of OBD2 scanners available at carscannertool.store to find the right tool for your needs and take control of your car’s health.
Frequently Asked Questions about OBD2 Scanner Connection
How do you use an OBD II scanner?
Simply plug the scanner connector into the OBD2 port under your dashboard, turn the ignition to the “ON” position (engine off), and follow the on-screen instructions provided by your scanner.
Does the car have to be running to use an OBD2 scanner?
No, in most cases, you can read trouble codes and access diagnostic information with the ignition in the “ON” position, without the engine running.
How do I read my OBD scanner results?
Navigate to the “Read Codes” option on your scanner’s menu. The scanner will display any active and pending DTCs. Record these codes and use a code lookup resource to understand their meaning.
Can you plug in an OBD scanner while the car is running?
While technically possible, it’s generally not recommended to plug in or unplug an OBD2 scanner while the engine is running. It’s best practice to connect and disconnect the scanner with the ignition off or in the “ON” position (engine off) to avoid potential electrical glitches.