
Removing a car bumper might seem like a daunting task, but with the right tools and a bit of know-how, it’s a manageable DIY project. Whether you’re aiming to replace a damaged bumper, access your headlights for repair or modification, or simply give your car a new look, understanding the tools required is the first crucial step. As car repair experts at carscannertool.store, we’ve put together this comprehensive guide to walk you through exactly what you’ll need to get the job done efficiently and safely.
Before you dive in, it’s essential to gather the necessary tools. Having everything within reach will not only speed up the process but also prevent damage to your vehicle. Let’s break down the essential tools for a successful car bumper removal.
Essential Tools for Bumper Removal
The specific tools you’ll need can vary slightly depending on your car’s make and model, but for most modern vehicles, you’ll find yourself using a similar set of equipment. Here’s a list of the core tools you should have on hand:
-
Socket Set: A comprehensive socket set is indispensable for removing bumper bolts and screws. Look for a set that includes both metric and SAE sizes to cover a wide range of vehicles. For bumper removal, you’ll commonly encounter:
- 8mm Socket: Frequently used for fender liner screws and lower bumper bolts.
- 10mm Socket: Often required for headlight bolts and some bumper brackets.
- 3/8″ Drive Ratchet: To use with your sockets, providing leverage and control.
- Socket Extensions (Various Lengths): Especially a 8″ extension, to reach recessed bolts in the fender liner or engine bay.
- 90 Degree Hex Socket (Optional but Helpful): For tight spaces where a regular ratchet and socket are difficult to maneuver.
-
Screwdrivers: Various types of screwdrivers are necessary to tackle different screw heads commonly found in bumper assemblies:
- Torx Screwdrivers/Bits (T25 & T30): Torx screws are frequently used in automotive applications, including bumper and headlight fixtures. Having both T25 and T30 sizes is crucial.
- Phillips Head Screwdriver (PH2): Standard Phillips head screws are also common, particularly for lower bumper and splash guard attachments.
- Hex Screwdriver/Bits (8mm & 10mm): Although sockets are typically preferred for hex bolts, a hex screwdriver or bit set can be useful for screws or bolts in more confined areas or when you need finer control.
-
Collection Bin: A small bin or magnetic parts tray is crucial for organizing and keeping track of all the screws, bolts, and clips you remove. This prevents loss and makes reassembly much easier.
-
Optional but Recommended Tools:
- Flat Head Screwdriver: Useful for prying clips, removing weather stripping, or gently separating bumper components.
- Needle Nose Pliers or Clamp Jaws: Helpful for manipulating clips, reaching into tight spots, or holding nuts in place when unscrewing bolts.
- Jack and Jack Stands: To safely lift the vehicle and gain access to the fender liners and lower bumper screws.
- Wheel Chocks: For safety, to prevent the car from rolling when lifted.
- Work Gloves: To protect your hands and improve grip.
- Penetrating Oil (like WD-40): To loosen stubborn or rusted screws and bolts.
Having these tools ready will set you up for a smoother and more efficient bumper removal process. Now, let’s walk through the general steps involved in removing a car bumper, keeping in mind that specific steps may vary for different car models.
Step-by-Step Guide to Removing Your Car Bumper (General Steps)
While this guide is based on a BMW F-Series, the general principles apply to most vehicles. Always consult your vehicle’s repair manual for model-specific instructions.
Step 1: Preparation and Safety
- Safety First: Ensure your car is parked on a level surface, in park (or in gear for manual transmissions), and the parking brake is engaged. Use wheel chocks behind the rear wheels for extra safety.
- Gather Your Tools: Have all the tools listed above within easy reach.
- Vehicle Access: In many cases, you’ll need to jack up the front of the car to access screws in the fender liners. Use a jack to lift one side at a time and securely place jack stands at the designated jacking points. Never work under a car supported only by a jack.
Step 2: Accessing Top Bumper Fasteners
- Open the Hood: Locate and release the hood latch (usually two pulls from inside the car).
- Remove Weather Stripping: Along the top edge of the engine bay, where the hood closes, you’ll typically find a rubber weather strip. Gently pull this up and remove it to expose screws that secure the top of the bumper and headlights.
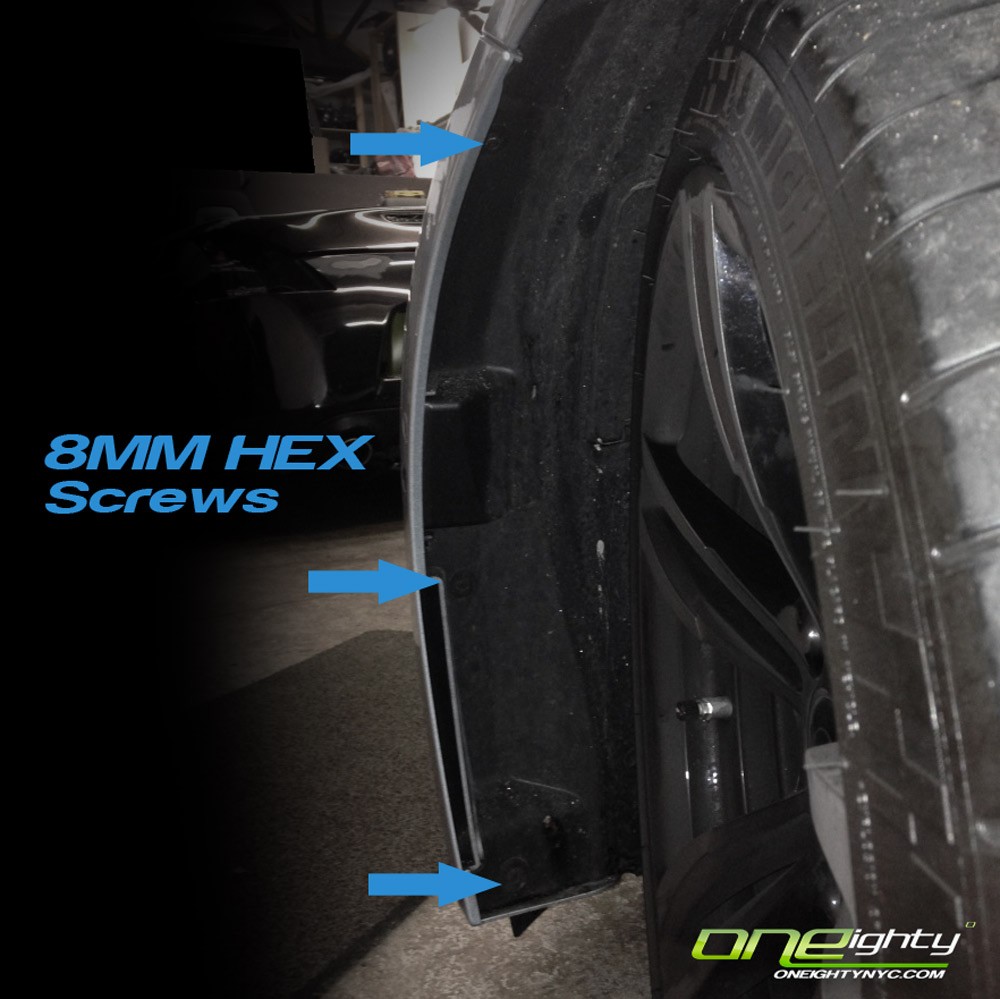
Step 3: Fender Liner Removal
- Access Fender Liner Screws: The fender liner (the plastic or fabric lining inside your wheel well) needs to be partially removed to access bolts that secure the bumper to the fender and sometimes headlight assemblies.
- Wheel Position: You can either remove the wheels completely for maximum access or turn the steering wheel inwards and outwards to reach all the screws.
- Locate and Remove Screws: Typically, 8mm screws hold the fender liner in place. There are usually screws along the edge of the bumper, at the bottom of the liner, and higher up in the wheel well. Use your 8mm socket and ratchet (and extension if needed) to remove these screws. Place them in your collection bin.
- Repeat on the Other Side: Mirror this process to remove the fender liner screws on the opposite side of the vehicle.
Step 4: Removing Lower Bumper Screws
- Underneath the Bumper: Look underneath the front bumper. You’ll find screws that attach the bumper to the lower engine cover or splash shields.
- Identify Screw Types: These are often a combination of 8mm hex screws and Phillips head screws.
- Remove Screws: Use the appropriate socket or Phillips head screwdriver to remove all the screws along the bottom edge of the bumper. Don’t forget the screws located near the corners of the bumper where it meets the fender.
Step 5: Disconnecting Sensors and Cameras (If Equipped)
- Locate Connectors: If your car has parking sensors, front cameras, or fog lights integrated into the bumper, you’ll need to disconnect their electrical connectors.
- Disconnect Carefully: Gently detach the connectors. They usually have a small clip that needs to be pressed before you can pull them apart.
Step 6: Side Bumper Screws
- Behind the Fender Edge: There are often screws located where the bumper meets the fender, usually behind the area of the side marker or reflectors.
- Remove Side Screws: Typically, these are also 8mm hex screws, but sometimes longer than the others. Remove these screws from both sides of the bumper.
Step 7: Bumper Detachment
- Carefully Wiggle and Pull: With all screws removed and sensors disconnected, the bumper should now be free to be detached. Start by gently wiggling the top edge of the bumper and pulling it slightly forward.
- Release Side and Bottom Clips: Work your way around the bumper, gently releasing any clips or tabs that might be holding it in place. Pay attention to the areas where the bumper meets the fenders and the lower engine cover.
- Headlight Washers and Final Disconnections: If your vehicle has headlight washers, you may need to disconnect the washer fluid hoses. You might need to pop off the washer caps and then carefully detach the nozzles and hoses.
- Two Person Lift (Recommended): It’s often easier and safer to have a helper assist in removing the bumper, especially for larger bumpers. One person can hold each side to prevent it from dropping and potentially getting damaged.
Step 8: Bumper Removed
- Once all connections are free, carefully lift the bumper away from the car and set it aside on a protected surface to prevent scratches.
Tips for a Smooth Bumper Removal
- Organize Screws: Use your collection bin diligently and consider labeling bags for different screw groups (e.g., fender liner screws, lower bumper screws) to simplify reassembly.
- Work Methodically: Follow the steps in a logical order and don’t force anything. If something feels stuck, double-check for any missed screws or connections.
- Extra Hands Help: Having an extra set of hands can be invaluable, especially when detaching and lifting the bumper.
- Dealing with Stubborn Fasteners: If you encounter a stubborn or rusted screw, apply penetrating oil and let it sit for a few minutes before attempting to remove it again.
- Be Gentle: Car bumpers are typically made of plastic and can be fragile. Avoid yanking or forcing the bumper, as this could lead to cracks or broken tabs.
Conclusion
Removing a car bumper is a task that’s well within the reach of a DIY enthusiast, provided you have the right tools and follow a systematic approach. By investing in a good socket set, screwdriver set, and a few essential hand tools, you can confidently tackle this job and save on professional labor costs. Remember to prioritize safety, work methodically, and consult your vehicle’s repair manual for any specific instructions. With the right preparation and tools, you’ll have your car bumper removed in no time, ready for your next automotive project!