Tinting your car windows is a fantastic way to enhance your vehicle’s aesthetics, boost privacy, and shield yourself and your car’s interior from the harsh effects of the sun. While professional services are readily available, many car enthusiasts and DIYers are turning to the rewarding task of tinting their windows at home. Not only can you save a significant amount of money, but you also gain a valuable new skill and the satisfaction of personal accomplishment. Whether you’re aiming to tint your windshield, side windows, or rear window, equipping yourself with the right tools is the first crucial step to achieving a professional-looking finish.
Why Should You Tint Your Car Windows?
Beyond just giving your car a sleek, custom look, window tinting offers a wealth of practical benefits that extend to comfort, protection, and even your vehicle’s long-term value. Let’s explore some compelling reasons why tinting your car windows is a worthwhile investment of your time and effort:
Enhanced Comfort and Cooler Interiors
Car window tint acts like a shield against the sun’s intense rays. By reducing the amount of solar heat entering your vehicle, tinting significantly lowers the interior temperature. This means on hot days, your car will be noticeably cooler, making your drives more comfortable and reducing your reliance on air conditioning. This not only enhances your comfort but can also contribute to fuel efficiency by lessening the strain on your car’s AC system.
Superior Temperature Regulation
Tinted windows are effective in maintaining a comfortable temperature inside your car, regardless of the season. In summer, they keep the heat out, and in winter, they help retain warmth inside the cabin. This consistent temperature regulation makes your car a more pleasant space to be in year-round.
Increased Privacy and Security
Darker window tints significantly enhance privacy by making it harder for onlookers to see inside your vehicle. This is particularly beneficial for protecting valuables left in your car from prying eyes, thereby reducing the risk of theft and break-ins.
Alt text: Car interior dashboard and seats protected from sunlight by window tint, preventing fading and cracking.
Protection for Your Car’s Interior
The sun’s ultraviolet (UV) rays are notorious for causing damage to car interiors. Prolonged exposure can lead to fading, cracking, and warping of upholstery, dashboards, and plastic components. Window tint acts as a barrier against these harmful UV rays, preserving the condition and appearance of your car’s interior for years to come.
Potential Boost to Resale Value
A vehicle with tinted windows can be more appealing to potential buyers. The added benefits of protection, privacy, and enhanced aesthetics can make your car stand out in the used car market and potentially increase its resale value. It’s a feature that many buyers appreciate for its immediate and long-term advantages.
Reduced Glare and Safer Driving
Window tint reduces glare from the sun and headlights, making driving safer and more comfortable, especially during bright daylight or nighttime driving when facing oncoming traffic. This reduction in glare minimizes eye strain and improves visibility, contributing to a safer driving experience.
UV Ray Protection for Health
Exposure to UV rays is a known risk factor for skin cancer. Car window tint blocks a significant percentage of these harmful rays, offering an added layer of protection for you and your passengers during your daily commutes and long drives. This is especially important for those who spend considerable time in their vehicles.
Essential Tools Needed to Tint Car Windows
To achieve a professional-quality window tint at home, you need to gather the right tools. While the specifics might vary slightly based on the type of tint film you choose and the complexity of your car windows, the following tools are considered essential for any DIY car window tinting project:
-
High-Quality Window Tint Film: This is the most crucial component. Choose a premium window tint film from a reputable brand. Consider the type of tint (dyed, metalized, hybrid, carbon, ceramic) based on your budget and desired performance characteristics like heat rejection, UV protection, and appearance. Measure your windows accurately to ensure you purchase enough film.
-
Razor Blade or Scraper: A sharp razor blade or scraper is indispensable for surface preparation. It’s used to meticulously clean the windows by removing any stubborn dirt, debris, or adhesive residue that could interfere with the tint film’s adhesion and finish. Use a new blade for each window to ensure a clean and scratch-free surface.
-
Utility Knife: Precision cutting is key in window tinting. A utility knife with a sharp, replaceable blade is used to trim the window tint film to the exact size and shape of your car windows. It allows for clean, accurate cuts, ensuring a perfect fit without gaps or overlaps.
-
Professional Squeegee Set: Squeegees are vital for both applying the slip solution and removing air bubbles and excess solution after the tint film is applied. A set with varying sizes and shapes is ideal. A hard card squeegee is perfect for pushing out bubbles and smoothing the film, while softer edge squeegees are gentler on the film surface.
-
Hard Card (or Teflon Card): Often used in conjunction with a squeegee, a hard card or Teflon card helps to apply firm, even pressure to the tint film. It’s particularly useful for working out air bubbles and creases in tight corners and along window edges where a larger squeegee might be cumbersome. Teflon cards are preferred by some professionals as they glide smoothly and are less likely to scratch the tint film.
-
Lint-Free Cloths or Paper Towels: Maintaining a clean working environment is crucial. Lint-free cloths or paper towels are used extensively throughout the tinting process. They are needed for cleaning windows, wiping up excess slip solution, and even wrapping around a squeegee to protect the tint film during bubble removal. Ensure you have a plentiful supply to avoid using soiled cloths that could reintroduce dirt.
-
Heat Gun (or Hair Dryer): A heat gun is an invaluable tool, especially for cars with curved rear windows or complex window shapes. The controlled heat from a heat gun softens the tint film, making it pliable and allowing it to conform to the window’s contours without creasing or wrinkling. A hair dryer can be used as a less powerful alternative, but a heat gun offers more efficient and precise heating.
-
Spray Bottles (Two or More): Spray bottles are essential for applying the necessary liquids. You’ll need at least two: one for a slip solution (water mixed with a few drops of mild dish soap) to aid in positioning the tint film, and another for clean water to rinse the windows and spray during cleaning. Using separate bottles prevents contamination and ensures you’re always applying the correct solution.
-
Mild Dish Soap: A few drops of mild dish soap, when mixed with water in a spray bottle, create the slip solution. This solution is sprayed onto the window before applying the tint film, allowing you to easily slide and position the film correctly. It also helps to prevent the film from sticking prematurely and trapping air bubbles.
-
Measuring Tape or Ruler: Accurate measurements are critical for cutting the tint film to the correct size. A measuring tape or ruler ensures you cut pieces that perfectly fit each window, minimizing waste and ensuring a professional appearance. Measure each window individually, as sizes can vary slightly.
-
Duct Tape or Masking Tape: Tape is useful for temporarily holding the tint film in place on the window, especially when working on larger pieces or curved windows. It can secure the film while you squeegee out the solution and ensure it doesn’t shift during application. Masking tape is a gentler alternative that’s less likely to leave residue.
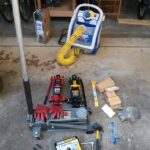
Alt text: Essential tools for car window tinting laid out on a workbench, including squeegees, spray bottles, tint film, utility knife, and razor blade.
Steps to Tint Your Car Windows (Brief Overview)
While a detailed step-by-step guide would be extensive, here’s a concise overview of the tinting process once you have your tools ready:
- Clean the Windows: Thoroughly clean both the interior and exterior of your car windows using a window cleaner and razor blade to remove all dirt and contaminants.
- Measure and Cut the Tint Film: Measure each window and cut the tint film slightly larger than the window size.
- Apply Slip Solution: Spray the exterior of the window with the slip solution.
- Heat Shrink (if necessary): For curved windows, use a heat gun to carefully shrink the tint film to the window’s shape.
- Clean Interior Window and Apply Slip Solution: Clean the interior of the window again and spray generously with slip solution.
- Apply Tint Film: Carefully peel the backing liner from the tint film and apply it to the interior window.
- Squeegee Out Solution and Air Bubbles: Use a squeegee and hard card to remove the slip solution and any air bubbles, working from the center outwards.
- Trim Edges: Trim any excess film around the edges of the window using a utility knife for a clean finish.
- Final Squeegee and Inspection: Do a final squeegee to ensure adhesion and inspect for any remaining bubbles or imperfections.
Pro Tips for DIY Car Window Tinting
- Work in a Clean Environment: Choose a dust-free indoor space, like a garage, to minimize contamination under the tint film.
- Patience is Key: Take your time and don’t rush the process. Window tinting requires precision and attention to detail.
- Practice on a Flat Surface: If you’re a beginner, practice applying tint film to a piece of glass or a flat window to get comfortable with the tools and techniques.
- Use Plenty of Slip Solution: Don’t be stingy with the slip solution. It’s essential for positioning the film and preventing creases.
- Start with Easier Windows: Begin with the flat side windows before tackling the more challenging curved rear window.
- Check Local Tint Laws: Before applying tint, familiarize yourself with your state’s laws regarding legal tint darkness levels to avoid violations.
By gathering the right tools and following a meticulous approach, tinting your car windows at home can be a successful and rewarding DIY project. Not only will you enhance your car’s appearance and comfort, but you’ll also gain a sense of accomplishment and save money compared to professional installation. Remember to invest in quality tools and tint film for the best results and longevity.