USB Link 2, developed by Nexiq, is a vital tool for vehicle diagnostics and information retrieval. This comprehensive guide outlines how to download and install the necessary Usb Link 2 Drivers for seamless communication between the device and your PC. Whether you’re a seasoned mechanic or a DIY enthusiast, ensuring you have the correct drivers is crucial for optimal performance.
 Installing the USB Link 2 driver
Understanding the Importance of USB Link 2 Drivers
The USB Link 2 interface relies on specific drivers to bridge the communication gap between the hardware and your computer’s operating system. These drivers enable the software applications on your PC to interact with the USB Link 2, allowing you to access vehicle data and perform diagnostic tests. Without the correct drivers, the device won’t function properly, hindering your ability to troubleshoot vehicle issues.
Downloading USB Link 2 Drivers: A Step-by-Step Approach
Obtaining the correct drivers for your USB Link 2 is straightforward. Follow these steps to ensure a smooth download process:
- Navigate to the Official Nexiq Website: Visit the official Nexiq website, the trusted source for authentic drivers.
- Locate the Driver Download Section: Find the dedicated driver download area, typically labeled “Support” or “Downloads.”
- Identify the Correct Driver Version: Select the appropriate USB Link 2 driver version that corresponds to your operating system (Windows 7, 8, or 10) and architecture (32-bit or 64-bit). Choosing the correct version ensures compatibility and avoids potential conflicts.
- Initiate the Download: Click the download button to begin the process. Save the driver file to a convenient location on your computer.
Installing USB Link 2 Drivers: A Comprehensive Walkthrough
Once you’ve downloaded the drivers, follow these installation steps:
- Locate the Downloaded File: Find the downloaded driver file (usually an .exe file) and double-click it to launch the installation wizard.
- Grant Administrator Permissions: If prompted by User Account Control, click “Yes” to authorize the installation process.
- Accept the License Agreement: Carefully review the license agreement and click “I Agree” to proceed.
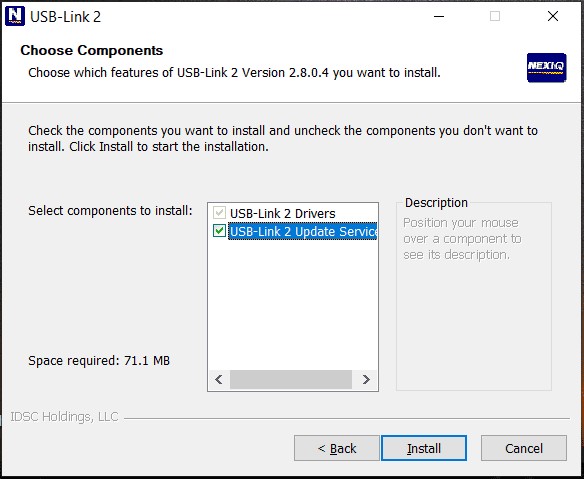
- Select Components and Install: Choose the desired components to install and click “Install.” Follow the on-screen prompts to complete the installation.
- Verify Installation: After installation, connect your USB Link 2 to your PC and confirm that it’s recognized by the system. You can typically check this in Device Manager.
Alternative Installation Methods: Automated Solutions
While manual installation is reliable, automated solutions can simplify the process:
- Driver Update Tools: Utilize driver update software, such as Driver Booster or Driver Easy, to automatically detect and install the necessary USB Link 2 drivers.
- Device Manager Update: Open Device Manager, locate the Nexiq device, right-click, and choose “Update driver.” Windows will attempt to find and install the latest driver automatically.
Troubleshooting USB Link 2 Driver Issues
If you encounter problems during installation or usage, consider these troubleshooting tips:
- Verify Compatibility: Double-check that you’ve downloaded the correct driver version for your operating system.
- Uninstall and Reinstall: Try uninstalling the existing drivers and reinstalling them from scratch.
- Consult Nexiq Support: If problems persist, contact Nexiq’s customer support for assistance.
Conclusion: Ensuring Seamless Vehicle Diagnostics with USB Link 2 Drivers
Properly installed USB Link 2 drivers are essential for leveraging the full capabilities of this powerful diagnostic tool. By following this guide, you can confidently download and install the correct drivers, ensuring smooth communication between your USB Link 2 and your PC. This enables accurate vehicle diagnostics, empowering you to effectively troubleshoot and maintain your vehicles.