
If you own a 2005-2007 Toyota Corolla and have recently replaced the ECM with a used one, you might encounter a no-start issue. This is often due to the immobilizer system not recognizing the new ECM. This guide will walk you through the process of synchronizing the immobilizer using the Toyota OBD2 pins, a simple procedure you can perform yourself.
Understanding the Immobilizer System and No-Start Problem
When your Corolla cranks but doesn’t start after an ECM replacement, the immobilizer is a likely culprit. The immobilizer system prevents theft by disabling the engine if the correct key isn’t detected. A used ECM retains the key codes from the donor vehicle, causing a mismatch with your keys. Before proceeding, ensure your issue is indeed immobilizer-related: the starter should crank normally, but the engine won’t fire. If the starter doesn’t engage, the problem may lie with the aftermarket alarm system often found in these Corollas.
This guide focuses on the immobilizer synchronization process. However, if the starter is disabled, consult the “Alarm System Troubleshooting” section later in this article. A factory-installed immobilizer typically disables the fuel injection and/or ignition system, while an aftermarket alarm system usually cuts off the starter motor.
Toyota Corolla Immobilizer Synchronization: The OBD2 Solution
There are two solutions to this problem: synchronizing the immobilizer or reprogramming the ECM. Synchronization, a free DIY procedure using the Toyota OBD2 pins, is often successful. It involves jumping two specific pins in the OBD2 port with the ignition switched on for 30 minutes.
Synchronization might fail if the ECM’s memory is full, damaged, or if the ECM itself is faulty. If synchronization doesn’t work, professional ECM reprogramming is necessary.
Step-by-Step Immobilizer Synchronization Guide using OBD2 Pins
Before you begin, ensure your car battery is fully charged to avoid voltage drops during the 30-minute synchronization process. A voltage drop can interrupt the process, requiring a restart. If using a battery charger, ensure it’s a quality unit that doesn’t introduce electrical noise. Ideally, fully charge your battery beforehand and disconnect the charger during the synchronization.
Here are the steps to synchronize your Toyota Corolla’s immobilizer:
-
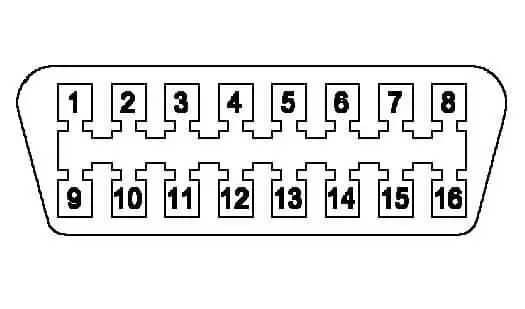
Locate the OBD2 Port: The OBD2 port is a 16-pin connector located under the driver’s side dash, near the hood release lever.
-
Jump OBD2 Pins 4 and 13: With the ignition off, use a straightened paperclip to jump pins 4 and 13 in the OBD2 port.
-
Turn the Ignition On: With the paperclip in place, turn the ignition key to the “ON” position (do not start the engine). Leave it in this position for 30 minutes. Observe the dashboard lights; flashing lights indicate the process is working. If no lights flash, double-check your connections and the battery voltage.
-
Turn Off Ignition and Remove Jumper: After 30 minutes, turn the ignition off and remove the paperclip. Attempt to start the engine. If successful, the immobilizer has been synchronized. If the engine still doesn’t start, the ECM might require professional reprogramming.
Alarm System Troubleshooting
If your starter motor doesn’t crank, the problem might be with the aftermarket alarm system, not the immobilizer. Disconnecting the battery for extended periods can sometimes trigger the alarm system, preventing the starter from engaging.
Try resetting the alarm using the key fob or the security button (if equipped). If that doesn’t work and your car has the security button like below, try:
- Turn the ignition to the “ON” position without starting the engine.
- Press the security button twice.
- Attempt to start the engine.
Conclusion
Synchronizing the immobilizer using the Toyota OBD2 pins is a straightforward process that can save you time and money. By following this guide, you can potentially resolve the no-start issue yourself. However, remember that professional help might be needed if synchronization fails. Always ensure a fully charged battery and correct pin connections for a successful synchronization.