Controlling your Line 6 M5 with a custom Arduino MIDI controller offers extensive creative possibilities. However, establishing successful communication between the devices can be challenging. This guide addresses common issues encountered when using an Arduino to control a Line 6 M5 via MIDI and provides troubleshooting solutions.
Common Arduino MIDI Control Issues with Line 6 M5
Many users struggle to send MIDI messages from an Arduino to their Line 6 M5 effectively. The problem often stems from incorrect code implementation or communication setup. Two common coding approaches involve using the Arduino’s built-in serial communication or a dedicated MIDI library.
Basic Serial Communication Code for MIDI
A simple approach involves utilizing the Serial.write() function to send MIDI messages directly. Here’s an example:
void setup() {
  Serial.begin(31250); // MIDI baud rate
}

void loop() {
  noteOn(0xC1, 0x00);
  delay(1000);
  noteOn(0xC1, 0x02);
  delay(1000);
}

void noteOn(int cmd, int pitch) {
  Serial.write(cmd);
  Serial.write(pitch);
}
This code attempts to send a note on message, but may not work due to missing components like a status byte or velocity value.
Utilizing the MIDI Library
The Arduino MIDI library simplifies MIDI message construction and transmission. Here’s an example using the library:
#include <MIDI.h>

MIDI_CREATE_DEFAULT_INSTANCE();

void setup() {
  MIDI.begin(1); // MIDI Channel 1
}

void loop() {
  MIDI.sendProgramChange(0x04, 1);
  delay(2000);
  MIDI.sendProgramChange(0x05, 1);
}
This code uses the sendProgramChange function, but its effectiveness depends on correct MIDI channel selection and matching it with the Line 6 M5’s settings.
Troubleshooting Steps
If your code isn’t working, consider the following:
- Baud Rate: Ensure the Arduino’s baud rate (31250) matches the MIDI standard.
- MIDI Channel: Verify that the MIDI channel used in your code aligns with the channel your Line 6 M5 is listening on. Refer to the Line 6 M5 Manual for MIDI channel settings.
- Wiring: Double-check your wiring. Connect the Arduino’s TX pin to the M5’s MIDI IN and ensure a common ground connection. A MIDI adapter might be necessary since Arduino uses TTL serial communication while MIDI uses a 5-pin DIN connector with current loop interface.
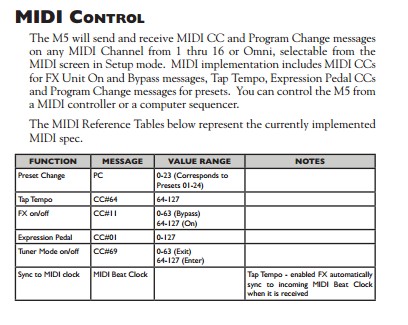
- MIDI Implementation: The Line 6 M5’s MIDI implementation might have specific requirements. Consult the Line 6 M5 manual for details on supported MIDI messages and their format. The provided image from the manual suggests the M5 supports program changes, but understanding the specific commands for different parameters is crucial.
 midi line 6 m5.PNG
Conclusion
Successfully controlling your Line 6 M5 with an Arduino requires careful attention to code, wiring, and MIDI protocol specifics. By addressing the common issues outlined above and consulting the Line 6 M5 manual, you can overcome these challenges and unlock the full potential of MIDI control for your guitar effects processor. Remember to review the M5’s documentation for comprehensive understanding of its MIDI implementation.