
Working on your car’s interior, whether for repairs, upgrades, or customization, often requires removing trim and upholstery panels. Attempting this without the correct tools can lead to damage, frustration, and potentially costly mistakes. That’s where car upholstery removal tools come in handy. These specialized tools are designed to safely and efficiently detach interior components without harming your vehicle. This guide will walk you through How To Use Car Upholstery Removal Tools effectively, ensuring your DIY car projects are a success.
Understanding Car Upholstery Removal Tools
Alt text: Comprehensive kit of car interior trim removal tools in various shapes and sizes, laid out on a white background, showcasing the variety available for different automotive upholstery removal tasks.
Car upholstery removal tools, also known as interior trim removal tools, are engineered specifically for the delicate task of removing interior car parts. Unlike generic tools like screwdrivers or pliers, these tools are crafted from materials like durable nylon, plastic, or sometimes metal with protective coatings, to prevent scratching, gouging, or breaking plastic components. They come in a variety of shapes and sizes, each designed for specific types of trim, clips, and panels found within a vehicle’s interior. Using the correct tool is crucial for maintaining the integrity and appearance of your car’s interior.
Types of Car Upholstery Removal Tools
Alt text: Assortment of thirteen car trim removal tools in bright orange plastic, including various pry tools and clip removal tools, against a white background, illustrating the different tool types for auto upholstery work.
To effectively use car upholstery removal tools, it’s helpful to understand the common types available:
Pry Tools
Pry tools are fundamental for any car interior project. These are typically flat, wedge-shaped tools designed to slide into narrow gaps and gently pry components apart. Made from non-marring materials like nylon, they prevent scratches on delicate surfaces. Pry tools come in diverse shapes – from pointed tips for tight corners to wider, curved ends for broader panels. Their flexibility and varying thicknesses allow for precise leverage without damaging the surrounding trim or paint.
Panel Removal Tools
Panel removal tools are designed for larger, more robust panels such as door cards or dashboard sections. They are generally sturdier than pry tools, often featuring a handle for better grip and control. Many panel removal tools incorporate both a pointed end for initial insertion and a wider, forked end for prying leverage. These tools are essential for distributing force evenly across larger areas, minimizing the risk of bending or breaking panels during removal.
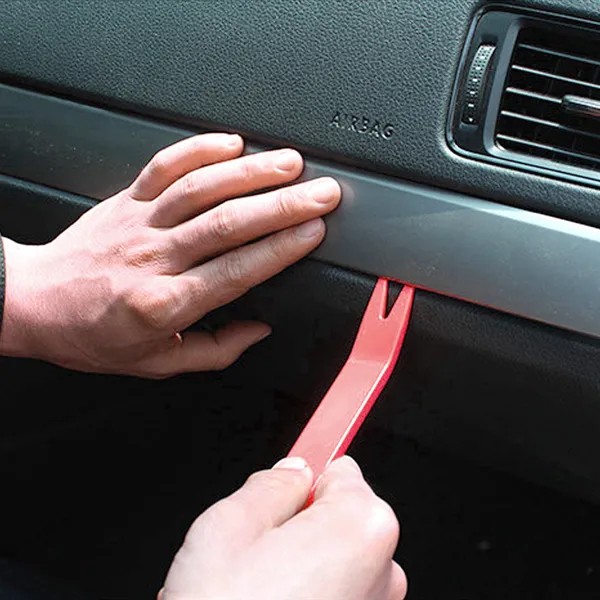
Step-by-Step Guide: How to Use Car Upholstery Removal Tools
Alt text: Close-up of a hand using a blue plastic car trim removal tool to gently pry off a car door panel, demonstrating the correct technique for using upholstery removal tools in auto interiors.
Knowing how to use car upholstery removal tools correctly is just as important as having them. Follow these steps for safe and effective trim removal:
-
Identify the Trim Type: Before you begin, carefully examine the trim or panel you intend to remove. Note how it’s attached. Is it held by clips, screws, or a combination of both? Different attachment methods will require different approaches and tool types.
-
Prepare the Area: Protect adjacent surfaces from accidental scratches. Use masking tape around the edges of the trim you’re removing, especially on painted areas or delicate materials. This provides an extra layer of defense against slips or tool marks.
-
Choose the Right Tool: Select a tool that matches the type of trim and the space you’re working in. For tight spots and delicate trim, start with a slim pry tool. For larger panels, use a panel removal tool. Having a variety of tools in your kit ensures you’re prepared for any situation.
-
Insert the Tool Carefully: Gently wedge the edge of your chosen tool into the seam or gap where the trim meets the surrounding surface. Avoid forcing the tool. If you encounter significant resistance, re-examine the trim for screws or additional fasteners you might have missed.
-
Apply Leverage and Pry: Once the tool is inserted, apply gentle, even pressure to pry the trim away. Work slowly and methodically, feeling for the clips releasing. If you’re removing a panel held by multiple clips, work your way around the edges, releasing clips one by one rather than trying to pull the entire piece off at once.
-
Remove Retaining Clips: Often, trim pieces are held in place by plastic clips that remain attached to the car body after the trim is removed. Use a clip removal tool – often shaped like pliers with a forked end – to carefully extract these clips. This prevents damage to the clips and makes reinstallation easier.
-
Organize Removed Parts: As you remove trim pieces and clips, organize them carefully. Use small containers or bags to keep screws, clips, and trim panels together and labeled. This will save you significant time and frustration during reassembly.
Tips for Purchasing Car Upholstery Removal Tools
Investing in a good set of car upholstery removal tools is a wise decision for anyone working on car interiors. Here are key considerations when buying:
- Material Quality: Opt for tools made from high-quality, durable materials. Nylon and reinforced plastics offer a good balance of strength and non-marring properties. Avoid brittle plastics that can break under pressure.
- Kit Versatility: Choose a kit that includes a variety of tool shapes and sizes. A comprehensive set will prepare you for a wider range of trim removal tasks, from door panels to dashboard components.
- Handle Grip: Look for tools with comfortable, ergonomic handles. A good grip enhances control and reduces hand fatigue, especially during longer projects.
- Brand Reputation and Reviews: Research brands known for producing quality automotive tools. Read customer reviews to gauge the durability and effectiveness of different tool sets.
Frequently Asked Questions
What Damage Can Occur Using Incorrect Tools?
Using screwdrivers, knives, or other improper tools can easily damage your car’s interior. This can result in scratches, dents, broken clips, and even cracked plastic panels. These damages not only detract from your car’s appearance but can also compromise the integrity of interior components.
Can I Use Regular Tools Instead of Specialized Upholstery Tools?
While you might be tempted to use household tools, specialized car upholstery removal tools are designed to minimize damage. Regular tools are often too rigid or sharp, increasing the risk of harm to delicate interior parts. Investing in the right tools is a small price to pay compared to the cost of repairing damaged trim or upholstery.
Are Safety Precautions Necessary When Using These Tools?
Yes, basic safety precautions are advisable. Wear gloves to protect your hands and safety glasses to shield your eyes from any dislodged debris or snapping clips.
How Long Will Car Upholstery Removal Tools Last?
With proper care and cleaning, a quality set of car upholstery removal tools can last for many years of DIY car projects. Store them in a tool bag or case to keep them organized and protected from damage.
Are These Tools Suitable for All Car Types?
Yes, car upholstery removal tools are universally designed for use across various vehicle makes and models. The key is to have a versatile set that addresses the range of trim and clip types found in different vehicles.
Conclusion
Mastering how to use car upholstery removal tools is a valuable skill for any car enthusiast or DIYer. By using the correct tools and techniques, you can confidently tackle interior repairs, upgrades, and modifications without causing damage. Investing in a quality set of these tools is an investment in preserving your vehicle’s interior and ensuring successful DIY projects for years to come.