Wool pressing mats have surged in popularity within the quilting and sewing community, and for good reason. These mats offer a unique pressing experience, helping achieve flatter seams and more precise blocks. However, to ensure your wool pressing mat continues to perform at its best, proper care is essential. This guide will walk you through everything you need to know about maintaining your wool pressing mat, ensuring its longevity and effectiveness for all your pressing needs.
Understanding Your Wool Pressing Mat
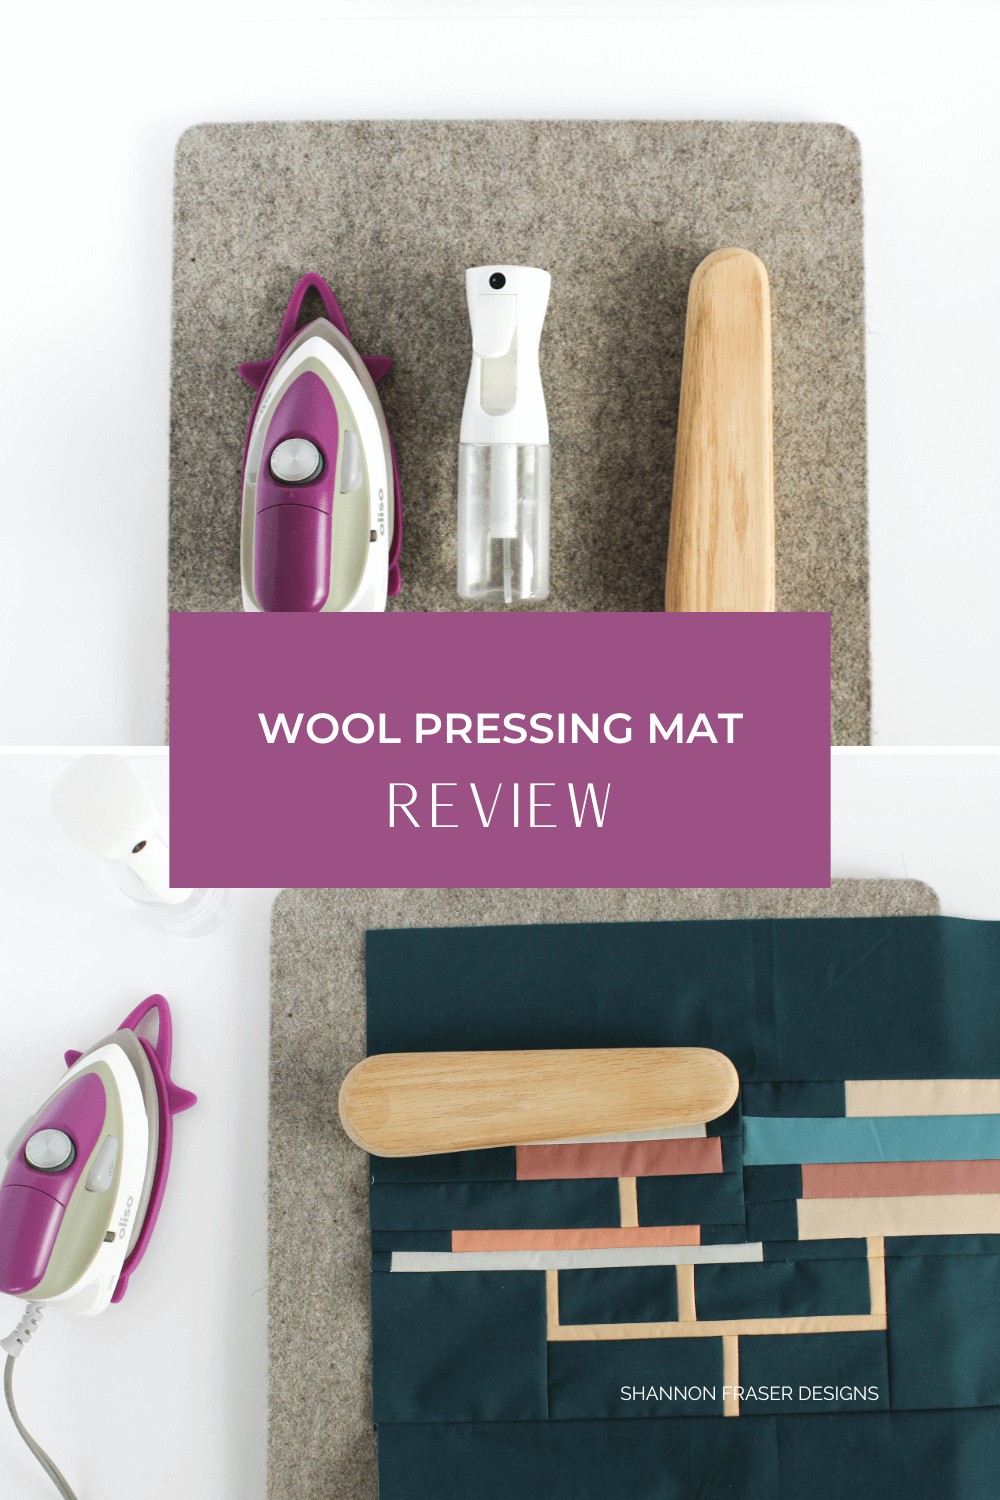
Before diving into care tips, let’s understand what a wool pressing mat is and why it’s beneficial. Essentially, these mats are crafted from compressed wool fibers, typically formed into square or rectangular shapes. They are designed to be placed on your ironing board or work surface to enhance your pressing process.
The magic of wool pressing mats lies in wool’s natural properties. As a flame-resistant material, wool excels at both absorbing and reflecting heat. This dual action means your fabric is heated from both the top (by your iron) and the bottom (by the reflected heat from the mat). This simultaneous heating significantly speeds up pressing time and improves the overall flatness of your seams.
Furthermore, the inherent texture of wool provides a slight grip on fabrics. This helps to minimize stretching and warping as you press, leading to more accurate quilt blocks and keeping your piecing straight and true.
Essential Daily Care for Your Wool Pressing Mat
Maintaining your wool pressing mat doesn’t require extensive effort, but consistent daily care will make a significant difference in its lifespan and performance.
Regular Lint Removal
Just like any fabric surface, wool pressing mats can attract lint, threads, and fabric fibers over time. Regularly removing this debris is crucial to keep your mat clean and functioning optimally. The best tool for this task is a simple lint roller.
After each pressing session, or even midway through if you’re working on a large project, take a few moments to run a lint roller across the surface of your mat. This will quickly pick up any stray fibers and prevent them from becoming embedded in the wool.
Storage Tips
Proper storage is another key aspect of daily care. To maintain the shape and integrity of your wool pressing mat, always store it flat. Avoid folding or creasing the mat, as this can create permanent lines and affect its pressing surface.
Choose a dry storage location away from direct sunlight. Excessive moisture can lead to mildew or odors, while prolonged sun exposure can degrade natural fibers. A shelf, a large drawer, or even leaning it upright against a wall in your sewing room are all suitable storage options.
Deep Cleaning Your Wool Pressing Mat: Step-by-Step
While daily lint removal is important, occasional deep cleaning is necessary to refresh your wool pressing mat and address any potential odors or stains. Hand washing is the recommended method for deep cleaning.
Hand Washing Method
- Prepare a Basin: Fill a basin or tub with lukewarm water. Add a small amount of mild soap or a wool-specific detergent. Avoid harsh chemicals or bleach, as these can damage the wool fibers.
- Submerge and Gently Wash: Fully submerge your wool pressing mat in the soapy water. Gently agitate the water and use your hands to lightly massage the mat, loosening any dirt or buildup. Avoid scrubbing or twisting the mat aggressively, as this can distort its shape.
- Rinse Thoroughly: Drain the soapy water and refill the basin with clean, lukewarm water. Rinse the mat several times, gently squeezing out the soap until the water runs clear. Ensure all soap residue is removed, as leftover soap can attract dirt and affect the mat’s performance.
- Remove Excess Water: After rinsing, carefully lift the mat out of the water. Gently squeeze out as much excess water as possible without wringing or twisting. You can also roll the mat in a clean, absorbent towel to help remove more moisture.
- Air Dry Flat: Lay the wool pressing mat flat to air dry. Choose a well-ventilated area away from direct sunlight or heat sources. Drying time will vary depending on the thickness of your mat and the humidity, but ensure it is completely dry before using it again to prevent mildew or odors. You can flip the mat periodically to ensure even drying.
Addressing Odors
Some wool pressing mats may have a natural “wool” or slight “wet dog” smell, especially when new or when used with steam. While this odor is typically harmless and often dissipates over time, you can use several methods to minimize or eliminate it.
Baking Soda Treatment
Baking soda is a natural odor absorber and can effectively neutralize smells in your wool pressing mat.
- Sprinkle Baking Soda: Generously sprinkle baking soda over the entire surface of your dry wool pressing mat.
- Let it Sit: Allow the baking soda to sit on the mat for at least 24 hours, or even up to 48 hours for stronger odors.
- Shake Off and Air Out: After the waiting period, shake off the baking soda thoroughly. Leave the mat in a well-ventilated area for another 24 hours to air out completely.
- Repeat if Necessary: If the odor persists, repeat the baking soda treatment process until the smell is gone.
Vinegar Solution
White vinegar is another natural odor neutralizer and disinfectant. It can help combat bacteria that may be contributing to unwanted smells in your wool pressing mat.
- Lightly Spray with Vinegar: Pour distilled white vinegar into a spray bottle. Lightly mist the surface of your wool pressing mat with vinegar. You don’t want to saturate the mat, just apply a light coating.
- Let it Sit: Allow the vinegar to sit on the mat for 15-20 minutes. The acidity of the vinegar will work to neutralize odors.
- Blot and Rinse: After the sitting time, blot the mat with a clean towel to absorb the vinegar. Then, lightly spray the mat with clean water to rinse away the vinegar. Blot again to remove excess water.
- Air Dry: Allow the wool pressing mat to air dry completely, laid flat, in a well-ventilated area.
Tea Tree Oil (For Stubborn Odors)
For persistent odors that don’t respond to baking soda or vinegar, tea tree oil can be a more potent solution due to its natural antifungal and antibacterial properties.
- Prepare Tea Tree Oil Solution: In a spray bottle, mix 2 tablespoons of tea tree oil with 1 cup of water. Shake well to combine.
- Lightly Spray Mat: Very lightly mist the surface of your wool pressing mat with the tea tree oil solution. Avoid saturating the mat, as tea tree oil is strong.
- Dry One Side, Repeat Other: Allow the first side to air dry completely. Then, flip the mat and repeat the light spraying and drying process on the second side. The tea tree oil scent will dissipate as it dries, taking unwanted odors with it.
Steam and Your Wool Pressing Mat: Dos and Don’ts
Steam is often used in pressing to help relax fabric fibers and achieve flatter seams. When using a wool pressing mat, the use of steam requires a bit of consideration.
For 100% wool pressing mats, steam is generally safe to use in moderation. The wool fibers can handle some moisture, and steam can enhance the pressing benefits. However, it’s crucial to avoid excessively wetting the mat. Over-saturation can lead to prolonged drying times and potentially encourage odors.
If your wool pressing mat is made from a blend of materials, especially if it contains synthetic fibers, it’s generally best to avoid using steam directly from your iron. Steam may not be as readily absorbed and could potentially damage the blended materials over time.
Fine Mist Spray Alternative
A great alternative to using steam directly from your iron is to use a fine mist spray bottle. This allows you to introduce a controlled amount of moisture to your fabric without oversaturating your wool pressing mat.
A fine mist spray bottle creates a very fine, even mist of water, preventing large droplets or puddles on your fabric. Lightly mist your fabric before pressing, or consider misting the wool pressing mat itself – this will have a similar effect, creating steam as the hot iron meets the damp wool.
Maintaining Longevity: Proactive Care Tips
Beyond cleaning, adopting these proactive care tips will further extend the life of your wool pressing mat:
- Use Heat Protection Underneath: Always place your wool pressing mat on a heat-resistant surface. While wool is flame-resistant, the heat can transfer through the mat over time and potentially damage delicate surfaces. Use a cork mat, a silicone ironing mat, or even a thick towel underneath your wool pressing mat for added protection.
- Avoid Excessive Wetting: As mentioned earlier, while some moisture is acceptable, avoid saturating your wool pressing mat. Excessive wetness can lead to odors, mildew, and prolonged drying times.
- Allow to Air Dry Completely: If your mat does become wet, whether from cleaning or excessive steam, ensure it is completely air-dried before storing or using it again. This prevents moisture buildup and potential issues.
Pros and Cons of Wool Pressing Mats (and How Care Plays a Role)
Understanding both the advantages and disadvantages of wool pressing mats helps you appreciate why proper care is so important.
Pros of Wool Pressing Mats:
- Enhanced Pressing: They provide superior pressing results due to heat reflection, leading to flatter seams and blocks. Proper care ensures this benefit is maintained over time.
- Fabric Stability: The wool texture minimizes stretching and warping. Keeping the surface clean and in good condition maximizes this fabric-gripping effect.
- Efficient Pressing: Heating from both sides speeds up pressing time. Careful use and maintenance prevent damage that could reduce this efficiency.
- Portability: They are typically lightweight and easy to move. Storing them flat, as recommended for care, also preserves their portability.
Cons of Wool Pressing Mats:
- Initial Odor: Some mats may have a slight wool odor initially. Proper cleaning and airing out, as part of care, can address this.
- Size Limitations: Standard sizes may be smaller than desired for large quilt tops. Care doesn’t change size, but proper maintenance ensures the mat remains effective for its intended use – block pressing.
- Heat Transfer: They require a protective layer underneath. This is a usage consideration, but care instructions remind users of this necessary precaution.
- Potential to Slide: Mats can sometimes slide on smooth surfaces. While care doesn’t directly address this, keeping the mat clean and dry helps maintain some grip.
Conclusion
Wool pressing mats are invaluable tools for quilters and sewists seeking professional-looking results. By following these comprehensive care guidelines, you can ensure your wool pressing mat remains a reliable and effective tool in your sewing room for years to come. Proper care not only extends the lifespan of your mat but also preserves its unique pressing benefits, making your quilting and sewing projects more enjoyable and successful. Remember, a little maintenance goes a long way in keeping your pressing tools in top condition!