
Measuring exhaust back pressure is a crucial step in diagnosing performance issues and optimizing your car’s exhaust system. While professional tools exist, a DIY Exhaust Pressure Tester can be built with readily available parts, allowing you to pinpoint restrictions and understand your system better. This guide walks you through building your own tester and interpreting the results.
Building Your Exhaust Pressure Tester
Creating an effective exhaust pressure tester requires a few key components, most of which can be found at your local auto parts or hardware store.
Gathering the Necessary Materials
You’ll need:
- Pressure Gauge: A mechanical pressure gauge reading up to 20 psi. Mechanical gauges are preferred for their durability and affordability in this application.
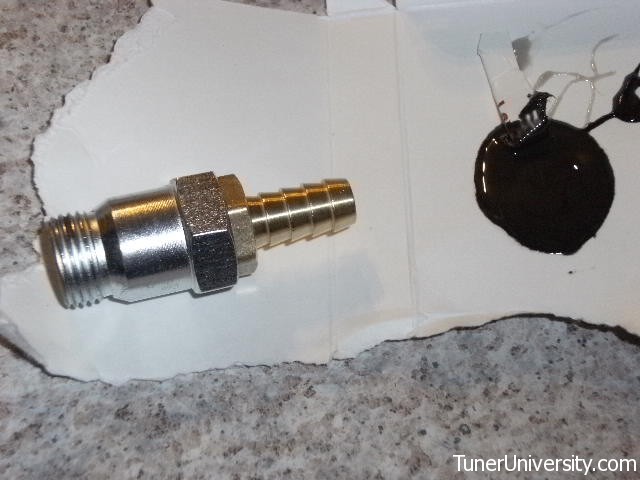
- Spark Plug Defouler: This threaded adapter, typically used to prevent spark plug fouling, conveniently shares the same threading as an oxygen (O2) sensor, providing a readily available tap into your exhaust system.
- Fitting: A brass fitting from the hardware store that screws securely into the spark plug defouler. JB Weld can be used to ensure a tight, leak-free seal.
- Transmission Fluid Hose: This type of hose is designed to withstand high temperatures, crucial for handling the heat generated by exhaust gases. Regular hose will likely melt.
- Hose Clamps: Securely fasten the hose to the fitting and gauge using strong hose clamps to prevent leaks and disconnections caused by exhaust pressure.
Spark plug defouler with a brass fitting attached for connecting the transmission fluid hose.
Assembling the Tester
- Prepare the Defouler: Screw the brass fitting into the spark plug defouler, ensuring a tight fit. Use JB Weld to permanently secure the connection and prevent leaks.
- Connect the Hose: Attach the transmission fluid hose to the fitting on the defouler and the other end to the pressure gauge. Use hose clamps to create airtight seals at both connections. Ensure the hose is free of kinks.
Testing Your Exhaust System
With your DIY exhaust pressure tester assembled, you can begin measuring back pressure.
Tapping into the Exhaust
The easiest way to access the exhaust system is through a secondary O2 sensor bung. Unscrew the sensor, secure it out of the way, and screw in your custom fitting. Alternatively, for more precise measurements, have a professional weld O2 sensor bungs at specific locations along your exhaust system.
Taking Measurements
Start the engine and let it reach operating temperature. Have a friend help you monitor the gauge while you perform a wide-open throttle (WOT) run. The gauge needle will fluctuate due to the pulsating nature of exhaust pressure; note the peak pressure reading.
Interpreting the Results
By taking measurements at different points along the exhaust, you can isolate restrictions. For instance, compare the pressure before and after the catalytic converter to determine its impact on back pressure. Generally, pressure should decrease as you move further downstream from the engine. Most stock exhaust systems exhibit peak pressures around 8-10 psi under full load, while well-designed aftermarket systems often fall in the 4-5 psi range or lower.
Analyzing the Data
Remember, these measurements are primarily for comparison. Track changes in back pressure after modifications to assess their effectiveness. Dramatic pressure drops indicate significant improvements in exhaust flow, potentially leading to performance gains. While lower back pressure is generally desirable, extremely low pressures can sometimes negatively impact low-end torque.
Consider a comprehensive performance tuning education to understand the complexities of exhaust system design.
Excessive back pressure can rob your engine of power. By using a DIY exhaust pressure tester, you gain valuable insights into your exhaust system’s performance and identify areas for improvement. This knowledge allows you to make informed decisions about modifications, ultimately optimizing your car’s performance potential.