Let’s delve into the world of cuticle care! This guide will cover everything you need to know: what cuticle care entails, why it’s essential, how to perform it effectively, and how to maintain healthy cuticles. As a nail care enthusiast and experienced nail technician, I’m passionate about this topic because proper cuticle care is the secret to making your manicures look professionally done and significantly extend their longevity. Let’s get started! Please note, the methods and opinions expressed here are based on my professional experience and preferences. If you choose to follow a different approach, that’s perfectly acceptable!
Understanding Cuticles and the Key Areas
There’s often discussion in the nail community about whether or not to cut cuticles. Having trained in nail technology and worked as a nail technician since 2021, I firmly believe in cutting cuticles, provided it’s done with proper knowledge and technique. This principle of informed practice applies to all aspects of nail care. For more on the importance of nail education before starting DIY nail care, refer to this blog post.
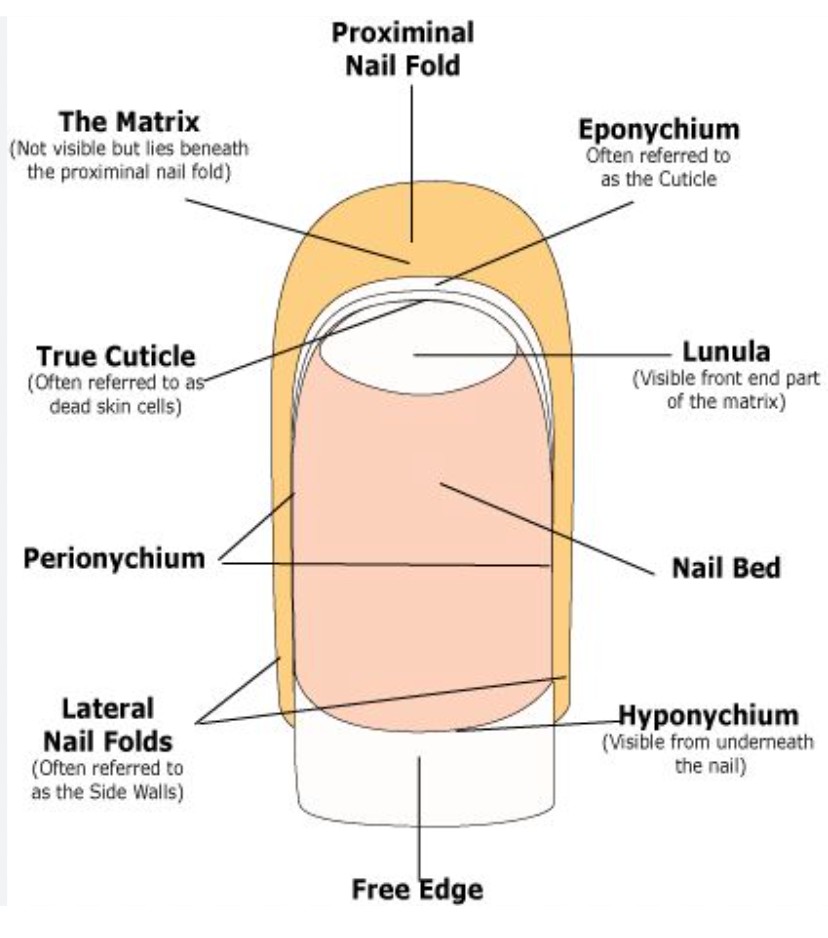
During nail school, a comprehensive understanding of nail anatomy is taught. Here’s a helpful diagram illustrating the different parts of the nail:
The common misconception about not cutting “cuticles” often refers to the eponychium, which is living tissue. However, the true cuticle is the dead skin that grows onto the nail plate and often adheres to it. Being dead tissue, it’s safe to remove, and its removal is actually beneficial for manicure longevity. Here’s another visual representation:
Cutting live skin, the eponychium, is strongly discouraged as it’s painful, unnecessary, and can lead to complications like infections or bleeding. Our focus today will be on the safe removal of cuticle and dead skin from the cuticle area, enhancing the appearance and durability of your manicures.
The Importance of Cuticle Care
It cannot be overstated: if you aim for a professional-looking manicure, want your nail polish to adhere flawlessly, showcasing the beautifully manicured nail bed, and desire extended manicure wear, especially with gel polish, cuticle care is indispensable. Neglecting cuticle care can result in messy manicures that are prone to chipping. Personally, I find cuticle care essential for maintaining a polished look over time and preventing hangnails and the urge to pick at the skin – goals we all share!
Specifically, cuticle removal is critical for gel manicures. As depicted in the images above, the cuticle is a thin layer of skin extending onto the nail. Since it’s easily removable, it’s not firmly attached to the nail plate. This means it can lift, and if gel polish is applied over it, the lifting cuticle will cause the gel to lift as well. Therefore, complete cuticle removal ensures that gel polish adheres directly to the nail plate, not the cuticle, maximizing adhesion and longevity.
Step-by-Step Guide to Cuticle Care
Several effective methods exist for cuticle care, all of which I continue to use. However, understanding the importance of a DRY MANICURE for safe and effective cuticle care is paramount.
A dry manicure involves performing the manicure without liquid elements, except for alcohol used for nail cleansing, which is actually dehydrating. Dry manicures are superior for cuticle care because rehydrating dead skin before removal defeats the purpose of differentiating between live and dead skin. Keeping the area dry allows for clear identification of dead cuticle for safe removal. Furthermore, dry manicures keep the nail bed dehydrated, preventing expansion and promoting better polish adhesion and longevity.
This approach means avoiding liquid cuticle removers. These products, often lotions or gels, are designed to dissolve cuticle from the nail plate, but they typically require rinsing with soapy water to neutralize, which rehydrates the nails – the opposite of what we want! I used to use these products but transitioned to dry manicures and haven’t looked back. I no longer even keep cuticle removers in my toolkit.
I consistently nip or cut away the dead skin lifted during the dry manicure process. The dryness makes it easy to distinguish dead skin – it’s tougher, drier, and often a different color than living skin, and easily lifts away. This process should be painless. If you experience pain, you’re cutting live skin and should stop. For detailed visual guidance on cuticle nipping, my Manicure Prep Course provides a thorough tutorial.
Hangnail removal is also incorporated into this process. In fact, dry manicures significantly reduce hangnails and peeling skin. By removing dead, dry skin and subsequently hydrating with cuticle oil, you create a clean foundation and prevent hangnails from worsening through picking. Hangnails are now a rarity for me thanks to this method.
Explore the Dry Manicure Prep Course!
For an in-depth understanding of dry manicures and my precise technique, my new Dry Manicure Prep Course! is an invaluable resource. It provides comprehensive instruction on dry manicures, essential tools, detailed cuticle care techniques (as described below), nail shaping, and complete nail preparation for any manicure type – from bare nails to regular polish and gel.
The course includes a video demonstrating cuticle removal on nails with significant cuticle overgrowth, providing an excellent example of the process in action. (Note: this course focuses on manual cuticle care, not e-file techniques, which are discussed later).
This course is fundamental to manicure longevity. Without proper prep, the manicure’s success is compromised. I typically dedicate about an hour to prep for clients because it is the crucial foundation for any lasting manicure.
Essential Cuticle Prep Tools:
Let’s discuss the necessary tools for effective cuticle care:
-
Alcohol: Standard rubbing alcohol (over 80% concentration) from any drugstore.
-
Cuticle Pusher: High-quality cuticle pusher is essential for gently pushing back cuticles and scraping away dead skin.
-
Cuticle Nipper: Sharp cuticle nippers are crucial for safely and effectively trimming dead cuticle. Invest in a new, sharp pair for optimal performance and safety. Dull nippers are more dangerous and less effective.
-
Buffers: New manicure buffers are vital. Replace your buffer frequently – ideally every manicure or every few manicures. Old buffers become ineffective. Bulk packs are a cost-effective solution for ensuring you always have fresh buffers.
-
Files: Fresh nail files are equally important. Replace files every few manicures, especially for gel fills. New files are significantly more effective. Multi-packs offer great value.
-
E-file (Optional but Recommended): Professional E-file (electric file) for precise cuticle work. This is a tool I highly recommend for enhanced cuticle care.
-
Cuticle Bit Set (for E-file): Specialized cuticle bit set for e-file. Using the correct bits is essential for safe and effective e-file cuticle work.
Cuticle Care Methods:
Here are two of my preferred methods for cuticle care. They are similar, with the primary difference being the inclusion of an e-file in the second method. Remember, this section focuses specifically on cuticle care and not the entire nail prep process. For a comprehensive prep tutorial, refer to my Dry Manicure Prep Course!
Method 1: Manual Cuticle Care
- Product Removal: Start by completely removing any existing nail product (polish or gel).
- Push and Scrape: Use a cuticle pusher to gently push back cuticles and carefully scrape off any loose cuticle from the nail plate.
- Buffing: Utilize a buffer to gently buff away lifted cuticle, focusing on the cuticle area.
- Nipping: Employ cuticle nippers to carefully trim away dead, dry, lifted skin around the cuticle area and on the nail plate. Also, remove any hangnails.
- Final Buff: Buff again if needed to smooth the area.
- Cleanse: Use a nylon brush and alcohol to remove dust and debris from the nail plate before applying polish.
Method 2: E-file Assisted Cuticle Care
I find using an e-file for cuticle work exceptionally beneficial due to its precision. It streamlines the process and contributes to more effective cuticle maintenance compared to manual methods alone.
A detailed video tutorial on using an e-file for gel removal and dry manicure prep, demonstrating this method safely, is included in my Gel Manicure 2.0 Masterclass: E-File Basics + Builder Gel Application Course. You can also access just the e-file cuticle portion in my E-File Basics Course.
Caution: Never use an e-file without proper training. Incorrect use can cause significant nail damage. While the e-file is excellent for cuticle work even without gel manicures, education is key. The fine cuticle bit is designed to be gentle on the nail and work directly on the nail surface. Enrolling in my course is highly recommended to learn safe and effective e-file techniques.
Here’s the e-file cuticle care method:
- Product Removal: Begin by removing all nail product.
- Push Cuticles: Gently push back cuticles to better expose the nail plate.
- E-file Exfoliation: Using an e-file with a cuticle bit at a low speed (10-15), gently exfoliate the cuticle from the nail plate.
- Buffing: Use a buffer to remove any remaining cuticle if necessary.
- Nipping: Trim any remaining dead, dry, lifted skin around the cuticle area and on the nail plate, including hangnails, using cuticle nippers.
- Final Buff: Buff again for smoothness.
- Cleanse: Clean the nail plate with a nylon brush and alcohol to remove dust before polish application.
Post-Care Hydration!
Hydration is crucial, especially after a dry manicure. At this stage, your nails are dehydrated and ready to absorb moisture. Hydrate only at the very end, after gel is fully cured or polish is completely dry. No oil should be applied before this point.
Nails naturally contain a small amount of oil. Acetone soak-offs for gel removal and dry manicures further dehydrate them. While dehydration is necessary during the manicure process, replenishing this oil is vital for nail flexibility, preventing breakage. Flexible nails are less likely to snap upon impact, as they can bend instead of breaking.
Hydration also improves gel manicure longevity. Flexible nails allow the gel to move and flex with natural nail growth, enhancing adhesion.
For those with very dry hands and cuticles, frequent application of a hydrating cuticle oil, multiple times daily, is essential. Keep cuticle oil in accessible locations at home and work to encourage regular use. Any cuticle oil is better than none. Consistent application is key to hydrated cuticles.
In addition to cuticle oil, use hydrating hand lotion multiple times daily and incorporate a rich hand salve. Hand salves are especially effective when massaged into cuticles and dry skin around the nails.
Here are some of my favorite hydration products:
(Note: Original article listed products with affiliate links, which are omitted here as per instructions.)
Remember to apply these products DAILY! Your nails will be healthier and stronger as a result.
Don’t forget to check out my Dry Manicure Prep Course for an exclusive price! It will transform your nail care routine.