For automotive enthusiasts and mechanics, having the right tools can make diagnostics and repairs significantly more efficient. Among these tools, a Car Breakout Tool, specifically a DME (Digital Motor Electronics) breakout box, can be invaluable. While professional, commercially available breakout boxes can be expensive, building your own DIY version is a cost-effective and rewarding project. This guide will walk you through the process of creating your own DME breakout tool, allowing for versatile testing and diagnostics of your vehicle’s electronic systems.
Why Build a DIY Breakout Tool?
Investing in a car breakout tool offers numerous advantages. It allows direct access to the ECU (Engine Control Unit) or DME wiring, making it easier to perform voltage checks, signal tracing, and component testing without damaging the original wiring harness. A DIY approach to building a DME breakout box provides several key benefits:
- Cost Savings: Commercial breakout boxes can be quite costly. Building your own significantly reduces expenses, especially if you have some components already available.
- Customization: You can tailor your breakout box to your specific needs and the types of vehicles you work on.
- Learning Experience: The DIY process itself is a great way to deepen your understanding of automotive electronics and wiring systems.
Gathering Your Materials
To embark on this project, you’ll need to gather a few key components. Sourcing used or spare parts can further minimize the cost. Here’s a list of essential materials:
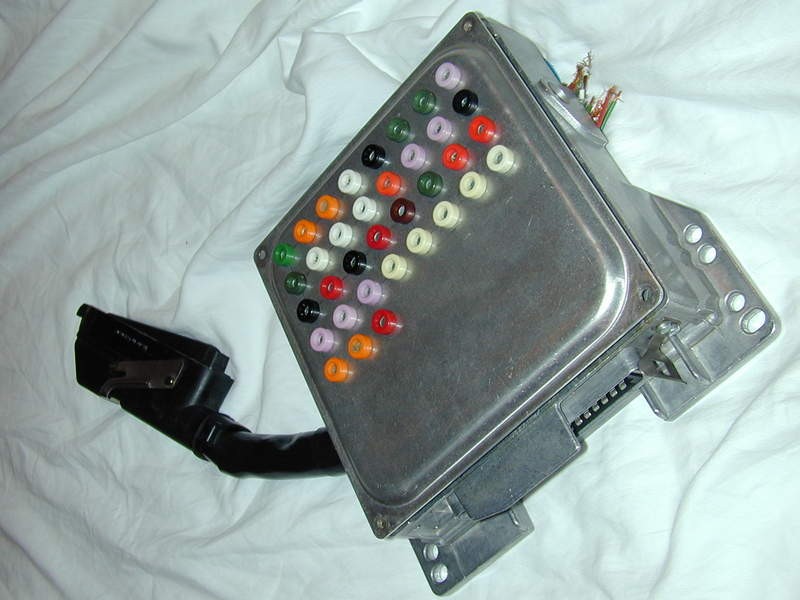
- DME Box (or similar enclosure): An old, non-functional DME box provides an ideal enclosure as it already has the correct shape and connector interface. Alternatively, a sturdy project box of similar dimensions can be used.
- 35-Pin Connector and Cable: A 35-pin connector that mates with your DME is crucial. Salvaging this from an old wiring harness is a practical approach. Ensure you have a length of wire attached to the connector for easier integration.
- Additional Connector Pins and Wires: To ensure all 35 pins are populated in your connector, you might need to source extra pins and wires. Automotive electrical repair shops or online suppliers specializing in connectors can be good resources.
- Banana Jack Receptacles: These will serve as the breakout points for testing. Choose quality banana jacks that can handle automotive electrical signals.
- Wire: Various colors of wire will help in color-coding your breakout box for easy identification of circuits.
- Heat Shrink Tubing or Electrical Tape: For insulating connections and ensuring a professional finish.
- Zip Ties: For cable management and strain relief.
Step-by-Step Guide to Building Your Breakout Box
Constructing your DIY car breakout tool involves a series of steps, from preparing the enclosure to wiring and final assembly.
Preparing the DME Box
- Disassemble the DME Box: If using an old DME box, carefully remove the internal circuit boards, leaving you with a hollow enclosure.
- Drill Cable Entry Hole: Drill a hole on the side of the DME box, large enough to accommodate the wiring harness. Position it strategically to allow for strain relief inside the box.
Wiring the Connectors
- Populate the 35-Pin Connector: Ensure all 35 pins of your connector are populated with wires. If your salvaged connector is not fully populated, add the extra pins and wires you sourced.
- Prepare Banana Jacks: Determine the layout for your banana jacks. A grid arrangement is efficient. Drill holes in the DME box lid (or project box panel) to mount the banana jack receptacles. Consider color-coding the jacks based on functional groups (e.g., power, ground, signals) for easier circuit identification.
Installing Banana Jacks
- Mount Banana Jacks: Securely mount the banana jack receptacles in the drilled holes.
- Solder Jumper Wires: Solder wires from each pin of the 35-pin connector to a corresponding banana jack. Maintain consistent color-coding throughout the wiring process to avoid confusion.
- Strain Relief: Route the wiring harness through the entry hole in the DME box. Use zip ties to secure the cable inside the box, providing strain relief and preventing damage to the soldered connections.
Final Assembly and Testing
- Assemble the Breakout Box: Carefully reassemble the DME box or close the project box, ensuring no wires are pinched or damaged.
- Testing: Before using your car breakout tool on a vehicle, thoroughly test each banana jack connection for continuity and correct pin assignment. Use a multimeter to verify each pin corresponds to the intended banana jack.
Benefits of Using a Car Breakout Tool
Once completed, your DIY car breakout tool will be an invaluable asset for automotive diagnostics. It allows you to:
- Easily Access ECU Pins: Provides convenient access points for testing ECU signals without back-probing delicate connectors.
- Perform Voltage and Continuity Tests: Quickly check voltage levels and circuit continuity at various points in the ECU wiring.
- Signal Injection and Simulation: Facilitates signal injection for component testing and system simulation.
- Isolate Faults: Simplifies the process of isolating electrical faults by allowing you to systematically test different sections of the wiring harness.
Building your own car breakout tool is a practical project that saves money and enhances your diagnostic capabilities. With careful planning and execution, you can create a robust and reliable tool that will serve you well in automotive electrical troubleshooting and repair.