For those in the automotive repair field, particularly when dealing with modern vehicles with digital odometers, the ability to perform mileage correction is a valuable skill. After successfully navigating the complexities of repairing Prius combination meters with the common “blank speedometer” issue, I became intrigued by the possibility of programming the mileage on replacement units. While generic mileage correction tools are available for many car models, their effectiveness on specific systems like the Toyota Prius can be limited. This article will share my journey into understanding and manually adjusting the odometer on a Prius, offering insights into the process and highlighting the nuances of what it truly takes to achieve accurate mileage correction, even when the “Best Mileage Correction Tool For All Cars” might fall short.
Unlocking the Secrets of Prius Odometer Data Storage
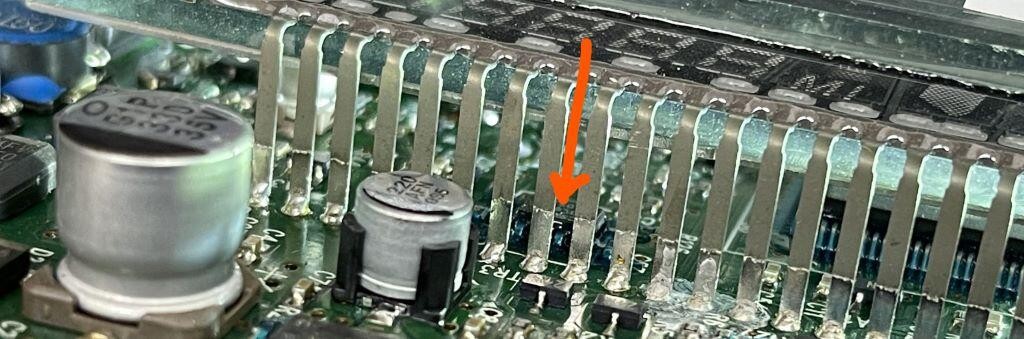
The Prius combination meter, like many modern digital instrument clusters, stores critical data, including the odometer reading, within an EEPROM (Electrically Erasable Programmable Read-Only Memory) chip. In the Prius, this data resides in a 93C66 EEPROM, conveniently positioned beneath the LCD screen. However, accessing this chip is no simple task. The LCD is firmly attached to the circuit board with around 75 through-hole pins, demanding patience and proficient desoldering skills. Removing the LCD can easily consume 30 minutes of careful work. Once the LCD is detached, you’ll encounter another hurdle: a solder mask covering the pins of the 93C66 chip, adding another layer of complexity to the process of accessing the memory chip for data manipulation.
Initially, I hoped to find easily accessible test pads on the back of the board connected to the 93C66 pins, envisioning a quicker access point. However, the only way to confirm this was to physically access the chip and test for continuity with an ohmmeter. This hands-on approach is often necessary when seeking to understand the inner workings of automotive electronics, especially when aiming for precise adjustments like odometer correction.
Decoding Prius Odometer Data: Beyond Simple Hex Editing
The odometer reading in a Prius is not stored in a straightforward decimal format. Instead, it utilizes a 4-digit hexadecimal code. This might seem limiting, as a 4-digit hex code can only represent up to 65,535 in decimal (FFFF). To overcome this, Toyota employs a clever multiplication factor. The 4-digit hex code is multiplied by 17 to derive the actual mileage. For example, the hex value 1673 (which is 5,747 in decimal) translates to 97,699 miles (17 x 5,747).
Interestingly, Toyota doesn’t just store this hex code once. It repeats the 4-digit hex code 17 times within the EEPROM data. So, for a mileage of 97,699, the data in the EEPROM would appear as a sequence of seventeen “1673” hex values.
But what happens when the desired mileage isn’t a perfect multiple of 17? Consider wanting to set the odometer to 97,700 miles. The next whole number after 1673 (5747 in decimal) is 1674 (5748 in decimal). However, 17 x 5748 equals 97,716, overshooting the target by 16 miles. This highlights that the odometer reading must increment in single mile units, not in jumps of 16 or 17.
The solution lies in a combination of hex codes. As shown in the data example above, a mileage of 97,692 is achieved by using a mix of “1673” and “1672” hex values. “1673” (5747 decimal) is repeated 10 times, and “1672” (5746 decimal) is repeated 7 times.
- 10 x 5747 = 57,470
- 7 x 5746 = 40,222
- 57,470 + 40,222 = 97,692
The odometer reading is calculated by summing these values, effectively allowing for single-mile increments despite the base-17 encoding. The data is read and summed from left to right, top to bottom, mimicking standard reading order.
The “Mask”: An Additional Layer of Complexity
Initially, I attempted to directly apply this understanding by mixing and matching combinations of 17 hex codes to achieve specific mileage values. However, simply changing the hex codes didn’t consistently result in single-mile increments in the odometer reading. While some combinations did alter the mileage, the changes weren’t predictable in single-mile steps. I could only achieve a limited set of mileage values, not the fine-grained control needed for accurate correction.
This is where the “mask” comes into play. For every instance where one of the 17 data spaces is filled with a hex value that is one greater than the original base hex code, a corresponding space in the “mask” area is changed from “0000” to “FFFF”. This “mask” is a 17-space block located immediately after the odometer data in the EEPROM. It acts as a modifier, influencing how the combination meter interprets the primary odometer data. Understanding and correctly manipulating this mask is crucial for precise mileage correction.
Essential Tools and Techniques for Prius EEPROM Programming
To effectively write to the Prius combination meter EEPROM and perform odometer correction, specialized tools are necessary. A key piece of equipment is an EEPROM reader/programmer. Affordable options like XGecu EEPROM programmers, available from platforms like EBay and Amazon, provide a cost-effective entry point. While the included software may require some troubleshooting and online tutorials (like YouTube videos) might be helpful, these programmers offer significant functionality for their price. For users seeking more automotive-specific tools with detailed guidance, Andromeda Research Labs offers more specialized and user-friendly solutions.
Streamlining the Setup: Jumpers and Pogo Pin Adapters
Initially, I used soldered wires connected to test points on the Prius circuit board to interface with the EEPROM programmer. These jumpers were connected to an adapter compatible with the programmer’s ZIF (Zero Insertion Force) socket.
This method was faster than accessing the chip directly behind the LCD, but still too time-consuming for efficient, repeated mileage corrections in a professional setting. To improve efficiency, I developed a pogo pin adapter. Using an old pocket screwdriver handle and a mill with a DRO (Digital Readout), I created precisely spaced holes (0.100″ apart) to accommodate spring-loaded pogo pins. While a mill provides precision, careful manual drilling could also achieve similar results. Pogo pins of various sizes are readily available on Amazon or EBay.
Over time, I’ve created several adapters for both in-circuit and out-of-circuit EEPROM programming. Creating the initial pigtail adapter takes slightly longer than simple jumpers, but it significantly accelerates subsequent jobs, making the process much more efficient for repeated mileage corrections.
Verifying Your Mileage Correction: Bench Testing the Prius Combination Meter
Before reinstalling the combination meter, verifying the accuracy of the mileage correction on the bench is essential. This requires a pinout diagram. I created one based on data from Toyota’s Technical Information System (TIS).
Applying 12V+ to pin 22 and 12V- to pin 14 should power up the meter and display the corrected mileage. Unfortunately, bench testing speedometer and odometer functionality is more complex. While a 5V square wave signal applied to pin 9 (with frequency corresponding to MPH) might move the speedometer, full odometer function requires the gear signal from the HV ECU (Hybrid Vehicle Electronic Control Unit), which is communicated to the combination meter via the gateway ECU over the BEAN network (pins 24/25). Replicating this network traffic for bench testing is a more advanced challenge, and something I am still exploring.
Final Thoughts and Further Exploration
Correcting mileage on a Toyota Prius, while not requiring the “best mileage correction tool for all cars” in the generic sense, demands a deep understanding of the specific system, meticulous technique, and appropriate tools. This exploration into Prius odometer adjustment highlights the intricacies of modern automotive electronics and the need for specialized knowledge beyond universal solutions.
If you’re venturing into Prius odometer correction, I hope this detailed walkthrough provides valuable insights. Remember to proceed with caution, respect legal and ethical guidelines regarding odometer adjustments, and continually expand your knowledge in this evolving field.
Further Reading:
- A misadventure with a Subaru immobilizer system and keyless entry
- Northridge Fix YouTube channel for micro-soldering techniques.
- A story of fixing the unfixable Prius transmission.
- Repairing a Toyota Hybrid Inverter.