
Front wheel bearings are crucial components for the smooth and safe operation of your vehicle. When these bearings start to wear out, they can cause a range of issues, from irritating noises to compromised handling. For Freelander 2 owners, tackling a front wheel bearing replacement might seem daunting, especially when considering the need for specialized tools. This guide delves into the world of Car Wheel Bearing Removal Tools, specifically for the Freelander 2, providing you with essential information to approach this DIY task with confidence.
Replacing front wheel bearings on a Freelander 2 isn’t just about swapping parts; it often requires a specific approach due to the Gen2 bearing design, where the bearing and hub flange are integrated. While some may consider alternative methods, using a car wheel bearing removal tool can be the most efficient and safest way to ensure a successful replacement.
Understanding the Need for a Car Wheel Bearing Removal Tool
The discussion around front wheel bearings for Freelander 2 often brings up the question of special tools. Unlike older vehicle designs, the Freelander 2 typically employs a Gen2 type bearing. This design necessitates applying force to the outer ring of the bearing during installation to prevent damage and ensure proper seating. Attempting to remove and install these bearings without the correct tools can lead to:
- Damage to the new bearing: Incorrect force application can ruin a new bearing before it’s even in place.
- Damage to the hub or knuckle: Improper techniques can damage surrounding components, leading to more costly repairs.
- Increased labor and time: Struggling without the right tools will inevitably prolong the job and increase frustration.
Therefore, investing in or renting a car wheel bearing removal tool designed for Gen2 bearings, and specifically compatible with Freelander 2, is a wise decision for DIY mechanics.
DIY Wheel Bearing Replacement on Freelander 2: Is it Possible?
Yes, replacing the front wheel bearing on a Freelander 2 at home is achievable, particularly with the right tools and guidance. While Land Rover might recommend specific press tools and spacers, the aftermarket offers more accessible and user-friendly car wheel bearing removal tool kits.
There are generally two paths you can take:
Option 1: Utilizing a Car Wheel Bearing Removal Tool
This method involves removing the old bearing and installing the new one while the hub remains on the vehicle. This approach has several advantages:
- Saves time and effort: No need to remove the entire knuckle assembly, reducing overall labor.
- Reduces risk of damage to other components: Minimizes disturbance to other suspension and brake parts.
- Cost-effective: Often cheaper than replacing the entire hub assembly, especially if the hub is still in good condition.
To execute this, you’ll need a car wheel bearing removal tool kit specifically designed for Gen2 bearings. These kits typically include:
- Bearing Separator/Puller: To safely extract the old bearing assembly.
- Drive Plates and Adaptors: To press in the new bearing, applying force correctly to the outer race.
- Force Screw and Thrust Bearings: For smooth and controlled removal and installation.
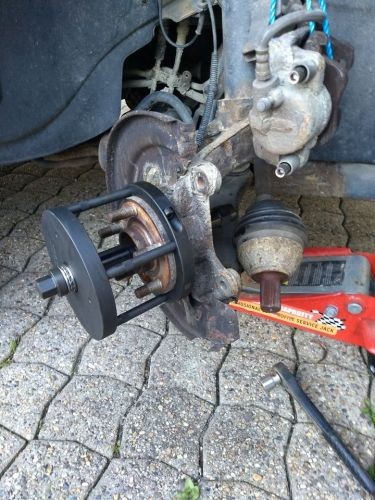
Using a car wheel bearing removal tool to extract the old front wheel bearing assembly from a Freelander 2, ensuring force is applied correctly for a clean removal.
A detailed view of the car wheel bearing removal tool in operation, highlighting the components that ensure precise and damage-free bearing extraction on a Freelander 2.
Demonstrating the leverage needed when using a car wheel bearing removal tool to pull out a stubborn old wheel bearing from a Freelander 2 hub assembly.
Option 2: Replacing the Complete Hub Assembly
An alternative, often considered easier for DIYers, is to replace the entire front steering knuckle, wheel hub, and bearing assembly as a single unit. This approach bypasses the need for pressing out and in bearings.
Pros:
- Faster process: Less intricate than bearing-only replacement.
- Potentially simpler: Reduces the chance of damaging the new bearing during installation.
Cons:
- More expensive: Replacing the entire assembly is significantly pricier than just the bearing.
- May be unnecessary: If the hub and knuckle are in good condition, replacing them is wasteful.
While quicker, replacing the whole assembly might not always be the most economical or necessary solution. For those comfortable with using tools, employing a car wheel bearing removal tool and replacing only the bearing can be more cost-effective.
Choosing the Right Car Wheel Bearing Removal Tool
When selecting a car wheel bearing removal tool, consider these factors:
- Compatibility: Ensure the tool is specifically designed for Gen2 bearings and ideally listed as compatible with Freelander 2 or similar vehicles.
- Kit Completeness: A comprehensive kit should include all necessary adaptors and plates for both removal and installation.
- Quality and Durability: Look for tools made from robust materials, capable of withstanding the force required for bearing removal and installation. Consider brands known for automotive tools.
- Ease of Use: Opt for a tool kit that is designed for relatively straightforward operation, even for DIY users. Some kits come with instructions or online video guides.
A typical car wheel bearing removal tool kit, showcasing the variety of adaptors and components necessary for a complete front wheel bearing replacement on vehicles like the Freelander 2.
Step-by-Step Guide: Using a Wheel Bearing Removal Tool (General Overview)
While specific instructions will vary depending on the tool kit and your Freelander 2 model, here’s a general outline of the process when using a car wheel bearing removal tool:
- Preparation: Safely lift and support the vehicle, remove the wheel, brake caliper, and brake disc.
- Access the Hub: Disconnect the ABS sensor and other components that might obstruct access to the wheel hub.
- Mount the Tool: Assemble the car wheel bearing removal tool around the hub, following the kit’s instructions for your vehicle type.
- Remove the Old Bearing: Use the tool to carefully and evenly pull out the old bearing assembly. This might require significant force.
- Prepare for New Bearing: Clean the hub and surrounding area to ensure a clean and smooth installation.
- Install the New Bearing: Using the appropriate adaptors from the kit, carefully press the new bearing into the hub, ensuring force is applied to the outer race only.
- Reassemble: Reinstall all components in reverse order: brake disc, caliper, wheel, and reconnect the ABS sensor.
- Test: Lower the vehicle and test drive to check for noise and proper operation.
Important Note: Always refer to your vehicle’s repair manual and the specific instructions provided with your car wheel bearing removal tool kit for detailed steps and safety precautions.
Conclusion: Benefits of Using a Car Wheel Bearing Removal Tool
Investing in a car wheel bearing removal tool for your Freelander 2 offers numerous advantages when tackling front wheel bearing replacements:
- Professional Results: Ensures correct bearing installation, minimizing the risk of damage and premature failure.
- Cost Savings: Allows DIY replacement of just the bearing, avoiding the higher cost of complete hub assembly replacement and garage labor fees.
- Increased Confidence: Empowers DIY mechanics to handle more complex repairs at home.
- Versatility: Many kits are universal and can be used for other vehicles with Gen2 bearings, making them a worthwhile investment.
By using the correct car wheel bearing removal tool, replacing your Freelander 2’s front wheel bearings becomes a manageable DIY task, saving you money and ensuring your vehicle remains safe and sound on the road.